home categories contact about me store
This blog is part of at least one affiliate program. As an Amazon Associate I earn from qualifying purchases.

Friday, November 6, 2020

RV Renovation: Blinds, Curtains, Cornices, Faux Shiplap, & a Massive Couch

My husband was not super excited about putting screws in the walls of our camper, so it had always really limited what we were able to do using 3M Command hooks, velcro, etc.  After he saw the absurd number of screws and staples that came OUT of the camper as we removed pieces, he was less reluctant.
I made note of what size screws were used in different areas of the camper, their lengths, etc.  I wanted to be certain that as I drilled new holes for new elements that I wasn't exceeding what the depth of the walls (no need to puncture the exterior of the camper!😱)  I even kept screws and fasteners in labeled ziploc bags so that I could reference them later if needed.
The studs in our camper are metal.  It made hanging things with screws in some areas where I previously had 3M hooks a much less appealing option.  For example, I didn't want to hang some hooks between the bathroom vanity and the shower on the peel & stick Tic Tac Tiles, because there is a metal stud there in that very narrow space.  If I were to use another 3M hook, I'm afraid the weight of wet towels could pull my backsplash down.  So, I found other places to hang additional hooks where I could use screws and anchors where appropriate.  Because I had little information about where plumbing lines run, I was vigilant to stay away from any space that I thought it might be an issue, too.
I ordered simple Wrap Around Curtain Rods that help with room darkening so the curtains can meet the wall on the edges.  Everyone in the family likes a really dark sleeping space, so you'll see that theme carried throughout the camper.  I want the light during the day, but when it is time for bed, everyone wants it DARK.  Metal curtain rings with clips were an easy way to make these kitchen towel curtains work.  I can remove the middle clips and "criss cross" the fabric to keep the curtains from parting.  I ordered a pack of 12 Farmhouse-style kitchen towels and used 4 on each of the 2 windows in the master.  I kept the other 4 for the kitchen.  Because we do like it dark, I sewed the towels in pairs and added blackout fabric to the backs.


Remember how I had ordered enough fabric to recover the original couch?  Well, I didn't use all of it by any stretch since we didn't do that, but I was able to use that soft microfiber fabric in the bunkhouse.  I recovered the header over their closet, recovered all sections of the Cub Couches (even the two backrests not pictured here), and made simple pocket curtains that serve as blackout curtains.

Because you're going to see it in a second anyway, I'll let you in on my little secret.  While I LOVE the reclaimed shiplap wallpaper, it's not cheap.  I really wanted to add some visual interest in the slideout, but with the windows, cabinets, lamp, and massive couch, there's really not room for artwork, etc.  I had seen people try this general effect with Sharpie, and I just couldn't get on board.  I marked the walls every 6" and used this INCREDIBLY affordable grid marking graphic tape.  There were a couple of corners that didn't stick as well as I would have liked, so I used a tiny bit of super glue to secure those corners.  So far, so good!  

Which brings me to our new massive couch!  One of the biggest issues we had with the travel trailer as it was before renovation was the living space.  We are a family of 5, and when we bought it, the kids were still small.  We used to all fit around the banquet with no issues.  My husband and our young twins could easily all pile on the couch, and our other son and I could use the cub couches or a "Big Joe" chair.  Fast forward to today, and our fifteen-year-old son is taller than both my husband and me; he will likely pass 6' in the next few weeks.  He's a linebacker, and he's built like one.  Our 11-year-old daughter is already past my shoulders, and her twin brother isn't far behind.  We needed space to all hang out together.  We looked at SO MANY OPTIONS.  I pinned things, added things to my Amazon cart, looked online at all types of furniture stores, but I kept coming back to this couch.  
I kept looking at the weight and measurements and researching tirelessly how much weight the slideout could hold, and I was so nervous.  I couldn't find ANYTHING definitive.  Because of the weight - and a bit because of the slightly larger size - we decided against getting the sleeper sections of this modular sofa.  At the end of the day, the bunkhouse still can sleep 5 with 3 bunks and 2 cub couches, and this couch is big enough to sleep 2 more.  If we have more than 9 people in our camper for more than about 3 days, I fear something bad would happen.  
With all of the storage space inside each section, the size, and what we wanted for the space, it seemed like the only choice.  I was having real anxiety about the weight of the couch, but my husband was on board, so we ordered it.  
Y'all, I have a love/hate relationship with IKEA.  I know I'm not alone.  AmIRight?  They delivered all of the pieces for a VERY reasonable price in a very quick timeframe.  (So we had to hurry and get HOA permission to bring the camper back to the house so we could load the pieces at the house.)  However, when all of the pieces arrived the next day, they were in twenty-eight boxes.  28.  TWENTY.EIGHT.  It was so comical that I took a picture and texted it to my sister.  Her response was pretty funny.  After some initial aghast choice words, she texted back again, "That thing better be a dream."
As I began to open the boxes, there were of course more pieces and every cover needed to be ironed.  I should have expected it, but I had been naively hopeful that the covers would be on the pieces.

It fits perfectly!  We have a couple of inches on one end between the couch and the wall, but it's like it was made for this space.

With the faux shiplap done and the modular couch in (and Scotch Guarded), it was time for blinds!  As with everything else, I looked and searched and researched options.  I knew what I wanted in the main living area.  In the end, I spent more than I would have liked, but I love the results.  I had custom roller blackout blinds made, and they roll toward the window, so there's no gap for light at night.  I have noticed that the screws on some of the window casings don't leave much room for clearance, so I'm cognizant of them when I pull them down at night or up in the mornings.

To hide those blackout blinds, we cut down part of the former cornices, added new faces, and stained them.   When the blinds are up, you can't see them.

After the renovation was (almost) complete, we took it out for a weekend.  My husband and youngest son came out a day later due to a game, so it was Girl Central.  A mom friend, her two girls, my daughter, another friend, my sister, and I all stayed in the camper.  
There are a few more updates and loose ends that I need to tie up, but it was AWESOME.

Next up, decor, storage, a new coffee bar, and my converted banquet table....
Check out the rest of my RV posts here.

Peanuts Themed Christmas Bulletin Board

By now, you may have seen my Halloween or Thanksgiving Peanuts-inspired bulletin boards. Here is the same bulletin board decorated for December with Charlie Brown and the gang.  The blue and purple trees were cut with the school's VariQuest machine.  I used the old hand-rolled die cut machine for the white 1" snow dots and the lightbulbs for the dog house.  The characters were all done by hand in my living room.  I layered pieces of paper together to make each one before drawing on their faces.

The 4th grade teachers loved this so much that they asked me to decorate their hallway with a similar theme.  So I'll be back to share the full hallway decked out with the gang. 


Thursday, November 5, 2020

Interactive Bulletin Board: Light Up the Season with Kindness & FREE SVG

I love interactive bulletin boards at the Elementary School level.  This one was super easy!  All I did was roll out the black paper, paint the trees and wording, cut some light bulbs with the school's old hand-rolling die cutter, and add some white paper to fill the bottom of the board.  Easy peasy!

The kids would take a light bulb from the basket, write one nice thing they did for someone else that day, and put it in another basket.  I read through them before I added them to the trees to make sure nothing was inappropriate.  Slowly, one-by-one, the whole forest of trees "lit up."
I regret that I didn't get a picture of the board when we left for winter break.  It was awesome to see all of the little things the kids were doing for each other, their teachers, and their families in the weeks leading up to Christmas.


RV Renovation: Interior Lighting, Wallpaper, Vinyl, FREE SVGs, and More

I hope you're enjoying the journey of our travel trailer makeover.  It moves much more quickly for you in the blog world than it did for me in the actual real-life makeover, but I'm getting to relive the drastic transformation without having to go through all of the work again.

There were 2 spots in the camper that I've not been able to find new lights for due to the space required for the slides to come in.  One is in the bunkhouse, and the other is in the main living area.  For now, we'll keep the standard lights there, and I'm not entirely concerned if they don't ever get replaced.

I found these super cute Farmhouse Cage Lights, and I ordered them immediately!  I was so excited to get them installed.  They came with Edison bulbs that were perfect (or so I thought,) and I all but dragged my husband out to the storage facility to install them.  They wouldn't turn on.  He tried several different things, and we were trouble-shooting all kinds of things.  We spent about 2 weeks trying to get them to turn on.  Then, I found it!  I hadn't seen it on any of the blogs I had been reading, but sure enough...some campers ONLY support 12v bulbs.  Sure, we plug in with 50 amps to run our air conditioners, but our camper only supports 12v bulbs.  I was so excited to have these beauties come on as soon as we got 12v Edison bulbs!  The moral of the story is to make sure your light bulb matches the voltage of the existing fixtures whether it's 120v or 12v, be sure you know how your camper is wired.


Reclaimed Shiplap Peel & Stick Wallpaper

Yes, I painted our bathroom door that dark Iron Ore gray, because it gets so much traffic.  What you may NOT notice is that the cheap doorknob with no lock is GONE. Sayonara, sucker!  A new black doorknob with a lock has replaced it.  This is one upgrade that EVERYONE was excited about.  Why we didn't do it sooner, I have no idea.

I initially only bought a couple of rolls of this Peel & Stick Wallpaper.  (You want to make sure they were made in the same batch/lot so that the colors match, so it's good to order them all at once.)  I ended up using it in more places than I originally thought I would, and I had to order a 3rd roll.  Fortunately it matches my 2 original rolls.  I used it on the 2 walls you see here, one next to the main slide out, a wall as you enter the bunkhouse, on the master sliding door, and as an accent in our Master bedroom.

You can see the smudges on the chalk map above.  I initially used regular chalk, but of course, someone needed to touch it to see if it was real chalk.  So, I brought my chalk markers out and have labeled the states our RV has visited.
Chalk Map Peel & Stick Giant Decal
I cut the "Adventure Awaits" on my Silhouette,
and you can have that SVG file for FREE below.

I'm not a giant by any stretch, but I frequently bump my head on the slide out ceiling or lights even when they were the super low-profile standard camper lights that came with it.  I was determined to find a way to create something that is low profile that has a switch.  I wandered around our home improvement stores, and this is what I came up with!  

A piece of thin wood, some stain, black cast iron floor flange, a cast iron elbow, a coupler, a lamp receptacle, and wire.  (These were MUCH more affordable to make than some of my other lighting choices.)

I was able to find a coupler that fit perfectly over the base of the lamp receptacle, so once we had the new lamp receptacle wired, we super glued it inside of the coupler before assembling the light fixture.  The lamp receptacles I found were all for 3 way lights.  My light isn't 3 way, so I just click it twice to turn on and twice to turn off.  We made 2 of these for the living area in the slide out, and I have something very similar planned for over my kitchen sink.  Instead of having 1 light using an elbow, I have a T-pipe so that it will have 2 lights to brighten my sink and countertops like daylight. 
Barn Light and DIY Industrial Light

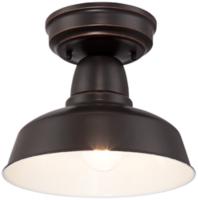
I ordered the barn light and was thrilled when it arrived.  I took it out of the box, and then it hit me....  There's not a SWITCH for that light like there is for the ceiling lights.  Fortunately, I had not yet thrown away the little MIS-MATCHED (yes, it really did annoy me that they were different colors) sconce light that came in the camper.  We pulled the wiring and button from it, and added it to my new barn light.  We added another 12v Edison, and it's perfect!
In our camper's bunkhouse alone, there are at least 6 light bulbs.  In the main living area, there were 14 light bulbs.  They put off a LOT of heat, and I've seen some RVs that actually have burn marks from those bulbs.  I knew I wanted to replace many of the fixtures (and I'm not done quite yet,) but this also gave us some incentive to replace all of the bulbs in the lights we were keeping with LED 12 volt bulbs.  The kids will actually turn their lights on now, because they don't feel like they have a heater next to their heads!

Standard Light Fixture in an RV
Standard Light on the left, LED on the right


When the lights are off, you really have to look to see if there's an incandescent or LED bulb.  Our incandescent lights were very "warm" literally and visually.  The LEDs are a more neutral white, and they don't emit the heat!

The same Reclaimed Shiplap Peel & Stick Wallpaper from the living area, but turned sideways in the Master Bedroom.

I cut this with my Silhouette as well, but I've tried to remove our wedding anniversary below the arrows from the image for the blog.  FREE Downloadable SVG is below.


Check out the rest of my RV posts here.

Wednesday, November 4, 2020

Homemade Tomato Basil Soup & Tomato Basil Bisque


Our local warehouse store had 2 lb. clamshells of Campari tomatoes, and while I usually use San Marzano tomatoes for soup or bisque, these worked beautifully!

Cut 4 lbs of tomatoes in half.
Clean and slice a red bell pepper.

Add tomatoes, bell pepper, and 8 garlic cloves to a rimmed baking sheet (the tomatoes will render a lot of liquid) or cake pan.
Drizzle with olive oil & generously season with salt and pepper.  Roast the tomatoes, pepper, and garlic at 400 degrees for 45 minutes.
Slice 1 yellow onion and place in a pan on the stove top with 2 T butter.  Caramelize over low heat while tomatoes are roasting. 

Transfer tomatoes, pepper, garlic, and onion to blender or large pot to blend with an immersion blender. 
Add 1-2 Cups of broth to reach the consistency you want if you are keeping it as a soup and not a bisque.  If you are making a bisque, add 1 C of broth.
Add 1/2 Cup of packed fresh basil, and blend.
Add 1 Tablespoon of Oregano, and Salt & Pepper to taste.  I also added 1 clove of Black Garlic.  It's a sweet and savory addition to the soup.
This is what it looks like when you remove the husk. Blend it into the soup.
If you have a a Parmesan rind, toss it in as the soup simmers for some added flavor.  

Allow the soup to simmer over low heat for at least 10 minutes.


You can remove the Parmesan rind and serve the Tomato Basil Soup with a basil garnish, fresh cracked black pepper, and grated Parmesan.  (If you're like me, you're probably also going to serve it with a grilled cheese sandwich.)


If you wish to make it a bisque, stir in 1 Cup of heavy whipping cream before serving.

Homemade Tomato Basil Soup or Bisque

Ingredients:

  • 4 lbs. tomatoes

  • 1 red bell pepper

  • 8 cloves of garlic

  • 2 T butter

  • 1 whole onion

  • 1-2 Cups of broth (vegetable or chicken)

  • 1/2 C packed fresh basil

  • 1 t dried oregano

  • Salt & Pepper

  • 1 clove Black Garlic (optional)

  • Parmesan Rind (optional)

Directions:

  1. Cut 4 lbs of tomatoes in half.

  2. Clean and slice a red bell pepper.

  3. Add tomatoes, bell pepper, and 8 garlic cloves to a rimmed baking sheet (the tomatoes will render a lot of liquid) or cake pan.

  4. Drizzle with olive oil & generously season with salt and pepper.  Roast the tomatoes, pepper, and garlic at 400 degrees for 45 minutes.

  5. Slice 1 yellow onion and place in a pan on the stove top with 2 T butter.  Caramelize over low heat while tomatoes are roasting. 

  6. Transfer tomatoes, pepper, garlic, and onion to blender or large pot to blend with an immersion blender. 

  7. Add 1-2 Cups of broth to reach the consistency you want if you are keeping it as a soup and not a bisque.  If you are making a bisque, add 1 C of broth.

  8. Add 1/2 Cup of packed fresh basil, and blend.

  9. Add 1 Tablespoon of Oregano, and Salt & Pepper to taste. 

  10.  Add 1 clove of Black Garlic and blend.

  11. If you have a a Parmesan rind, toss it in as the soup simmers for some added flavor.  

  12. Allow the soup to simmer over low heat for at least 10 minutes.

  13. You can remove the Parmesan rind and serve the Tomato Basil Soup with a basil garnish, fresh cracked black pepper, and grated Parmesan.  (If you're like me, you're probably also going to serve it with a grilled cheese sandwich.)

  14. If you wish to make it a bisque, stir in 1 Cup of heavy whipping cream before serving.