home categories contact about me store
This blog is part of at least one affiliate program. As an Amazon Associate I earn from qualifying purchases.
Showing posts with label Sew. Show all posts

Wednesday, November 11, 2020

RV Renovation: Decor, Coffee Bar, Organization, and more

Now that everything has been repainted, the lights are working, and our travel trailer doesn't look like a complete construction zone, let's get to the fun stuff!

Decor or organization?  Why can't it be both?
We were forever struggling with where to put sunglasses in our camper.  Wallets, keys, etc. all had "their place," but sunglasses had been relegated to the ledge of molding around the main living area slide out.  I found this little framed piece of chicken wire, and I immediately knew what I was going to do!  I stained it, created and stained two small wooden blocks to "lift it" away from the wall, glued them to the backside of the frame, and screwed the whole thing to the wall.  I think it's perfect!  As soon as we walk in, we have a place for our glasses in addition to all of the other things.  I found a cute black and white buffalo plaid basket that now houses our shoes, too.   

These two cute baskets are admittedly holding fake herbs (even though I do love having real ones in our home), but they also serve to hold lemons, limes, onions, heads of garlic when we are camping.  Then, those items don't take up extra space in the refrigerator or my small pantry, and they're at my fingertips while cooking.  I wood-burned the little cutting board's handle for some extra personalization.
I had seen the cast iron flange and copper pipe paper towel holder in a few places, and I loved the idea.  I don't remember which "list of supplies" I used, but for the love of peaches...CHECK to make sure that all of the pieces fit and will work together before you leave the store.  Between the paper towel holder and the toilet paper holder, I made more unnecessary trips to our local home improvement store than I even want to admit.  Not all 1/2" elbows are created equally, and my list said I needed a 90 degree male/female or "street" elbow.  LIES!  (Of course, I'm certain they didn't *intentionally* mislead me.)  If I had really looked at the item in its tiny little bag or considered the male/female part of it, I would have known that it was the wrong item.
Here is our shoe bin again and the "Farmhouse" kitchen mat that I found on sale at the craft and decor store.

A few other things that took up entirely too much countertop space...or even just SPACE if I moved them off of the counter when not in use were my Instant Pot and coffee maker.  I had even recently downsized our Keurig to this super narrow Mini Keurig for tight spaces.  Still.  I needed some of that "real estate" back.  I feel like that was probably the HARDEST thing for me to find for the renovation.  I wanted something that would fit in this very small space with an easily accessible outlet when the camper was stationary.  I wanted it to be big enough to store the Instant Pot (or coffee maker) inside.  It also had to be able to be moved for when we are on the road.  The slide out occupies that space when the slides are pulled in.  I felt like I was searching for a unicorn.
This is what I found, and I LOVE it.  The Instant Pot is hidden inside.  The baskets hold coffee pods, cups, and more.  It's just big enough to serve as a coffee (and tea - my daughter would remind me) station, and it's not in the way.  I will say that we are having to make some "accommodations" for it so that when it is on 3 different levels of the flooring that it is sturdy and level.  (A low-profile custom "box" with 2 sections built up and indentations for the table's feet is the answer.  Then, when the table is stowed for travel, it is still level.  When it is in use, it sits atop this custom piece.)

We were camping at Halloween, and my daughter thought we really needed this cute pumpkin for the trip.  
The little "Coffee Time" tile was actually part of a small piece of framed art, but I removed the frame, added felt pads, and use it as a spoon rest so that 5 spoons aren't in the sink before we've even eaten breakfast.

Coffee station art also came with some very specific requirements, although not nearly as difficult to find/make as the little table itself.  Everything needed to be super low-profile for the slide to come in.  I actually had more pieces for this area, but I decided to make one based on the side of a barn that we see every time we are in Cuchara, Colorado.

I had used some inexpensive tongue and groove wood for the "faces" of my new cornices over the living room windows.  With 3 short pieces of the tongue and groove, I glued them together, stained them, and painted this little sign with a twist for our last name.  (I teased my husband often while doing this renovation that since I was doing "farmhouse" there would be roosters and chickens EVERYWHERE.  At one point, I think he actually started to get worried.)  So far, this is the only rooster in the whole RV, but I did find some super cute "farm" fabric that I need to make a pillow or something with.  

Originally, before I decided to do the super small coffee station, my "unicorn" had an even longer list of requirements.  I *REALLY* wanted a small table that fit in that space with drop-leaf extensions on opposite ends so that I could have a butcher-block island to help with counter space, meal prep, and serving.  I'm telling you that I searched for MONTHS.
I still had our oddly shaped table from the banquet in the camper. (I had been using it as an extra surface that we NEEDED.)  

I *wanted* one solid butcher block that would cover the full base of the table but still be narrow enough to use as a coffee table or an island.  The travel trailer's original table was adjustable height to accommodate an additional person to sleep.
Butcher blocks that big are EXPENSIVE.  We even looked at some that are really intended to top work benches and tool chests, but none of those were big enough.


Two IKEA cutting boards turned upside down, joined with brackets, and screwed to the original table base made for a $40 adjustable height coffee table / butcher-block island.  I *do* wish I had taken some time in IKEA to find 2 boards that more closely matched the grain of each other, but it's perfect for what I needed.

This was on the Halloween camping trip (maiden voyage after the makeover,) and I found my daughter with a breakfast of champions....

The buffalo plaid coasters seemed like a must.
Adventure Awaits SVG file can be found here.

In our bedroom, I added a little pressed tin "E" with a lamb's ear wreath, the kitchen towel blackout curtains, reclaimed wood wallpaper in the inset, and the vinyl I cut on my Silhouette.  "It's always better when we're together."  (Free SVG can be found here.)

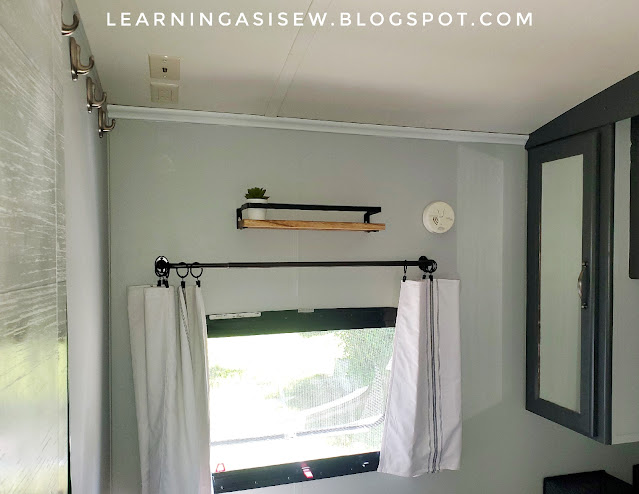
I added several 3M Command hooks for the broom, towels, etc.  We also have an over the door hook rack that we will have face into the Master bedroom.  The little shelf above my window gives me a space to corral small items, my Kindle Paperwhite, etc. so they don't get lost or smashed in the small space of our bedroom.  I will likely add a photo to the wall on that shelf or just above it.  I knew which ones I wanted in the kids' room, but I haven't chosen any for our room.

The bunkhouse....
As you enter the bunkhouse, there are 3 MixTiles photos of the kids and our boxer on the beach and some additional hooks for the kids specifically.

Here it is painted, but before I finished getting bedding and converting some of the banquette cushions to back cushions for each of the bunks.

As a super easy way to cover the banquette cushions for the kids to use on their beds, I ordered king-size pillow cases that have the "pocket" on the open end, and then did a quick sew job (on the already sewn edges) to make them the exact right size for each cushion.
Here, you can also see that there's a light blanket on the bed and a heavier fluffy one at the foot of each bed.  The 2 cub couches no longer shed that nasty pleather and are fully functional to make into 2 twin beds in the bunkhouse.

I added little ledge shelves for each kid to store their phone, a book, or other small items that would otherwise get lost in the bed.


Our travel trailer bathroom....
Possibly everyone's favorite functional upgrade to the camper is a new bathroom doorknob that LOCKS.  😜
The new shower curtain is plastic, and I cut it to be the size I wanted.  I had to order some more of the track curtain holders and hooks to accommodate the new curtain.  The geometric clear section allows for more light while taking a shower (without being a "window" into the shower.)
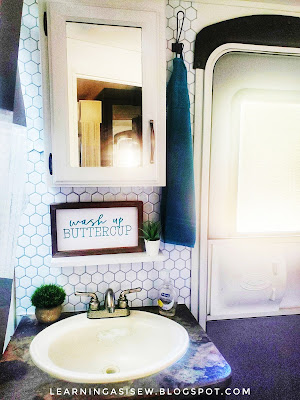
I added hooks EVERYWHERE in the bathroom.  33 to be exact.  I added them directly to the wall, on boards, and over the door.  With a family of 5, by the time you have hand towels, wash cloths, towels for showers, the beach, etc., we need a lot of hooks.

I made this little shelf with a piece of leftover wood from one of the other projects.  I painted it white, added 2 L brackets, screwed the "Wash up, Buttercup" sign and the little fake plant to the board from the under side, and attached it to the wall over those oh-so-cute (but still what nightmares are made of) hexagon Tic Tac Tiles.
There are a few more things that I plan to do in the travel trailer, but I couldn't be happier with our first wave of renovations!

Check out the rest of my RV posts here.

Friday, November 6, 2020

RV Renovation: Blinds, Curtains, Cornices, Faux Shiplap, & a Massive Couch

My husband was not super excited about putting screws in the walls of our camper, so it had always really limited what we were able to do using 3M Command hooks, velcro, etc.  After he saw the absurd number of screws and staples that came OUT of the camper as we removed pieces, he was less reluctant.
I made note of what size screws were used in different areas of the camper, their lengths, etc.  I wanted to be certain that as I drilled new holes for new elements that I wasn't exceeding what the depth of the walls (no need to puncture the exterior of the camper!😱)  I even kept screws and fasteners in labeled ziploc bags so that I could reference them later if needed.
The studs in our camper are metal.  It made hanging things with screws in some areas where I previously had 3M hooks a much less appealing option.  For example, I didn't want to hang some hooks between the bathroom vanity and the shower on the peel & stick Tic Tac Tiles, because there is a metal stud there in that very narrow space.  If I were to use another 3M hook, I'm afraid the weight of wet towels could pull my backsplash down.  So, I found other places to hang additional hooks where I could use screws and anchors where appropriate.  Because I had little information about where plumbing lines run, I was vigilant to stay away from any space that I thought it might be an issue, too.
I ordered simple Wrap Around Curtain Rods that help with room darkening so the curtains can meet the wall on the edges.  Everyone in the family likes a really dark sleeping space, so you'll see that theme carried throughout the camper.  I want the light during the day, but when it is time for bed, everyone wants it DARK.  Metal curtain rings with clips were an easy way to make these kitchen towel curtains work.  I can remove the middle clips and "criss cross" the fabric to keep the curtains from parting.  I ordered a pack of 12 Farmhouse-style kitchen towels and used 4 on each of the 2 windows in the master.  I kept the other 4 for the kitchen.  Because we do like it dark, I sewed the towels in pairs and added blackout fabric to the backs.


Remember how I had ordered enough fabric to recover the original couch?  Well, I didn't use all of it by any stretch since we didn't do that, but I was able to use that soft microfiber fabric in the bunkhouse.  I recovered the header over their closet, recovered all sections of the Cub Couches (even the two backrests not pictured here), and made simple pocket curtains that serve as blackout curtains.

Because you're going to see it in a second anyway, I'll let you in on my little secret.  While I LOVE the reclaimed shiplap wallpaper, it's not cheap.  I really wanted to add some visual interest in the slideout, but with the windows, cabinets, lamp, and massive couch, there's really not room for artwork, etc.  I had seen people try this general effect with Sharpie, and I just couldn't get on board.  I marked the walls every 6" and used this INCREDIBLY affordable grid marking graphic tape.  There were a couple of corners that didn't stick as well as I would have liked, so I used a tiny bit of super glue to secure those corners.  So far, so good!  

Which brings me to our new massive couch!  One of the biggest issues we had with the travel trailer as it was before renovation was the living space.  We are a family of 5, and when we bought it, the kids were still small.  We used to all fit around the banquet with no issues.  My husband and our young twins could easily all pile on the couch, and our other son and I could use the cub couches or a "Big Joe" chair.  Fast forward to today, and our fifteen-year-old son is taller than both my husband and me; he will likely pass 6' in the next few weeks.  He's a linebacker, and he's built like one.  Our 11-year-old daughter is already past my shoulders, and her twin brother isn't far behind.  We needed space to all hang out together.  We looked at SO MANY OPTIONS.  I pinned things, added things to my Amazon cart, looked online at all types of furniture stores, but I kept coming back to this couch.  
I kept looking at the weight and measurements and researching tirelessly how much weight the slideout could hold, and I was so nervous.  I couldn't find ANYTHING definitive.  Because of the weight - and a bit because of the slightly larger size - we decided against getting the sleeper sections of this modular sofa.  At the end of the day, the bunkhouse still can sleep 5 with 3 bunks and 2 cub couches, and this couch is big enough to sleep 2 more.  If we have more than 9 people in our camper for more than about 3 days, I fear something bad would happen.  
With all of the storage space inside each section, the size, and what we wanted for the space, it seemed like the only choice.  I was having real anxiety about the weight of the couch, but my husband was on board, so we ordered it.  
Y'all, I have a love/hate relationship with IKEA.  I know I'm not alone.  AmIRight?  They delivered all of the pieces for a VERY reasonable price in a very quick timeframe.  (So we had to hurry and get HOA permission to bring the camper back to the house so we could load the pieces at the house.)  However, when all of the pieces arrived the next day, they were in twenty-eight boxes.  28.  TWENTY.EIGHT.  It was so comical that I took a picture and texted it to my sister.  Her response was pretty funny.  After some initial aghast choice words, she texted back again, "That thing better be a dream."
As I began to open the boxes, there were of course more pieces and every cover needed to be ironed.  I should have expected it, but I had been naively hopeful that the covers would be on the pieces.

It fits perfectly!  We have a couple of inches on one end between the couch and the wall, but it's like it was made for this space.

With the faux shiplap done and the modular couch in (and Scotch Guarded), it was time for blinds!  As with everything else, I looked and searched and researched options.  I knew what I wanted in the main living area.  In the end, I spent more than I would have liked, but I love the results.  I had custom roller blackout blinds made, and they roll toward the window, so there's no gap for light at night.  I have noticed that the screws on some of the window casings don't leave much room for clearance, so I'm cognizant of them when I pull them down at night or up in the mornings.

To hide those blackout blinds, we cut down part of the former cornices, added new faces, and stained them.   When the blinds are up, you can't see them.

After the renovation was (almost) complete, we took it out for a weekend.  My husband and youngest son came out a day later due to a game, so it was Girl Central.  A mom friend, her two girls, my daughter, another friend, my sister, and I all stayed in the camper.  
There are a few more updates and loose ends that I need to tie up, but it was AWESOME.

Next up, decor, storage, a new coffee bar, and my converted banquet table....
Check out the rest of my RV posts here.

Tuesday, December 6, 2011

Bed of Clouds: Pillow Sleep Pallet

I saw this on Pinterest.  (If you need an invite to Pinterest, comment with your e-mail address, and I'll send you one.  Warning: it is not  my fault if you spend endless hours on Pinterest when you should be doing other things.)
I looked at several different options, and honestly, I thought "Great idea!  Still a little room for improvement."  The best one I found was on Oopsey Daisy by guest blogger from Our Wonder-filled Life.

I have a ton of these to make before Christmas....I've completed 3, and I have a minimum of 5 more to make.  Thank goodness they're quick and easy!  With a 6 year old and 2 year old twins, my sewing time is in VERY short and infrequent spurts, and I've managed to complete one a day thus far.

My modifications to Oopsey Daisy Our Wonder-filled Life's directions are as follows:

I bought 60 inch wide fleece, and I only needed 2 1/2 yards total per Bed of Clouds.  I mean, really, do you need 5 pillows high for a kid?  My 3 kids probably won't be using this when they're 5'8" or taller....So I decided that 4 pillows would be sufficient. (It requires less pillows and space when you try to store them, too.) The width of the fleece also meant that I didn't have to sew 2 pieces of fabric together, the "sealed" side was already done.

Now, you're doing the math and wondering why I needed 2 1/2 yards when it looks like 78-80" should be plenty (2 2/9 yards, or 2 1/3 yards at most places).  Well, I thought a pocket on the top pillow would be ideal for a book, ipod, phone, or whatever small items the kids didn't want to loose at night.  So there's a little extra fabric to cut off of the "top" of the fleece panel and use for the pockets.

I also embroidered names on the top "pillowcase" of each one. 

My directions are as follows:

Step 1: Measure and cut 79" of the fleece. 

Step 2: Pin & sew the long raw edges "under."  (These will be the opening side for the pillows to go in.)
Step 3: Determine the size you want your pocket to be using your "extra" fabric that you cut from the top.  Allow 1" for seam allowance along all 4 sides (2" more each direction total.)  Cut the pocket, pin edges under, sew the edges.

Step 4: Fold the long piece of fabric in half lengthwise.
Step 5: Measure 1 1/2 inches from the top of the long piece of fabric.  Place a pin on the folded edge.
Measure 19" down and place another pin; 19" down & another pin; 19" down & another pin; 19" down & a final pin.
Step 6: Take the pocket fabric and embellish it as you wish with any beads, ribbon, buttons, or embroidery.  Then place on the fold of the top "pillowcase."  My pockets are about 12-15" wide and about 5" tall when complete.  I centered them along the top "pillowcase" fold.  Remember to wrap the pocket under the fold, because when you insert the pillow, you want the pocket to be upright and not laying on top of the pillow.  Pin the sides and bottom of the pocket to the "pillowcase" and sew.
Step 7: Add any embroidery or other embellishments to the bed of clouds.  (I embroidered names on the top "pillowcase.")

Step 8: Turn the fabric "inside out" with the right sides facing each other and aligning the edges.  Pin along the very top and very bottom 1 1/2" from the edge.  Sew.  Reinforce with a second "pass."
Step 9: Turn right-side out.  Continue pinning at the three 19" marks all the way across the fabric to the openings.  Sew.  This creates 4 pockets.  Reinforce if desired.
 Step 10:  On the top "pillowcase," measure 6" from the top seam and 6" from the bottom seam and pin 12" of ribbon to the inside of each of the 4 marked spots.  Be sure to really reinforce these by sewing "squares" with "x's" inside them.  (They're really hard to see in the pictures, because the fleece hides it so well.)  Kids will be hard on this part.

Step 11: Do the same for the remaining 3 pillowcases with ribbon or sew-on velcro.

Step 12: Depending on how much fabric you purchased, you could easily create a little carrying bag for storage and transport.
Stuff with pillows & rest easy!

(Fabric.com and Hancock Fabric links are on the right sidebar of the blog.  Go Sew!)