home categories contact about me store
This blog is part of at least one affiliate program. As an Amazon Associate I earn from qualifying purchases.
Showing posts with label egg-free. Show all posts

Wednesday, November 4, 2020

Homemade Tomato Basil Soup & Tomato Basil Bisque


Our local warehouse store had 2 lb. clamshells of Campari tomatoes, and while I usually use San Marzano tomatoes for soup or bisque, these worked beautifully!

Cut 4 lbs of tomatoes in half.
Clean and slice a red bell pepper.

Add tomatoes, bell pepper, and 8 garlic cloves to a rimmed baking sheet (the tomatoes will render a lot of liquid) or cake pan.
Drizzle with olive oil & generously season with salt and pepper.  Roast the tomatoes, pepper, and garlic at 400 degrees for 45 minutes.
Slice 1 yellow onion and place in a pan on the stove top with 2 T butter.  Caramelize over low heat while tomatoes are roasting. 

Transfer tomatoes, pepper, garlic, and onion to blender or large pot to blend with an immersion blender. 
Add 1-2 Cups of broth to reach the consistency you want if you are keeping it as a soup and not a bisque.  If you are making a bisque, add 1 C of broth.
Add 1/2 Cup of packed fresh basil, and blend.
Add 1 Tablespoon of Oregano, and Salt & Pepper to taste.  I also added 1 clove of Black Garlic.  It's a sweet and savory addition to the soup.
This is what it looks like when you remove the husk. Blend it into the soup.
If you have a a Parmesan rind, toss it in as the soup simmers for some added flavor.  

Allow the soup to simmer over low heat for at least 10 minutes.


You can remove the Parmesan rind and serve the Tomato Basil Soup with a basil garnish, fresh cracked black pepper, and grated Parmesan.  (If you're like me, you're probably also going to serve it with a grilled cheese sandwich.)


If you wish to make it a bisque, stir in 1 Cup of heavy whipping cream before serving.

Homemade Tomato Basil Soup or Bisque

Ingredients:

  • 4 lbs. tomatoes

  • 1 red bell pepper

  • 8 cloves of garlic

  • 2 T butter

  • 1 whole onion

  • 1-2 Cups of broth (vegetable or chicken)

  • 1/2 C packed fresh basil

  • 1 t dried oregano

  • Salt & Pepper

  • 1 clove Black Garlic (optional)

  • Parmesan Rind (optional)

Directions:

  1. Cut 4 lbs of tomatoes in half.

  2. Clean and slice a red bell pepper.

  3. Add tomatoes, bell pepper, and 8 garlic cloves to a rimmed baking sheet (the tomatoes will render a lot of liquid) or cake pan.

  4. Drizzle with olive oil & generously season with salt and pepper.  Roast the tomatoes, pepper, and garlic at 400 degrees for 45 minutes.

  5. Slice 1 yellow onion and place in a pan on the stove top with 2 T butter.  Caramelize over low heat while tomatoes are roasting. 

  6. Transfer tomatoes, pepper, garlic, and onion to blender or large pot to blend with an immersion blender. 

  7. Add 1-2 Cups of broth to reach the consistency you want if you are keeping it as a soup and not a bisque.  If you are making a bisque, add 1 C of broth.

  8. Add 1/2 Cup of packed fresh basil, and blend.

  9. Add 1 Tablespoon of Oregano, and Salt & Pepper to taste. 

  10.  Add 1 clove of Black Garlic and blend.

  11. If you have a a Parmesan rind, toss it in as the soup simmers for some added flavor.  

  12. Allow the soup to simmer over low heat for at least 10 minutes.

  13. You can remove the Parmesan rind and serve the Tomato Basil Soup with a basil garnish, fresh cracked black pepper, and grated Parmesan.  (If you're like me, you're probably also going to serve it with a grilled cheese sandwich.)

  14. If you wish to make it a bisque, stir in 1 Cup of heavy whipping cream before serving.


Monday, November 2, 2020

Easy Pickled Peppers that are good on (almost) EVERYTHING!

You can use this recipe for ANY pepper!
Y'all!  A few months ago, I needed some pickled peppers for a recipe, and I realized we were out of jarred/canned pickled peppers.  <*Gasp* The horror!>  I sliced up and pickled a few fresh jalapeños we had on hand, and I LOVED THEM. Like, I never intend to buy pickled peppers again. 
We normally grow jalapeño, Serrano, and scotch bonnet peppers in our garden, but they have cross-pollenated the last few years making every pepper a "surprise Scoville mystery pepper."  This year, my husband picked up a Cowhorn Pepper plant that we have kept away from our gardens in its own container.  I had never had a Cowhorn.  
They are long skinny curved peppers that are green until they reach full maturity, but I love how pretty they are when I mix the red and green! 
Everything I've read puts them on par with an "average" jalapeño with regards to Scoville heat, but personally, we feel like they are hotter than most jalapeños - more like somewhere between a jalapeño and Serrano. 
They have great flavor, and when you pickled them with Rice Vinegar, Sugar, and Salt, they are so good on most ANYTHING! 
You can use this recipe to pickle any peppers that fit your personal heat preference. 

EASY PICKLED PEPPERS 

Ingredients:
Peppers, washed and sliced
6 T Rice Vinegar 
2 T White Sugar
1/2 t kosher salt 
Directions:
Mix all ingredients in a sealable container, seal, and refrigerate.


Wednesday, September 12, 2012

Birthday Party Camp Out

What happens when your kids want a "camp out" for their birthday, and you're a family that camps?  Well, it's taken literally.  What happens when the mom is also an event planner and can't seem to get her head around "just cupcakes" or S'mores while camping (and she's incredibly busy with a large wedding the weekend before)?  She turns to PrintMagic on Etsy a couple of months in advance, a local print shop (and a pair of scissors) in the weeks prior, and a well-stocked small bag by the week of the camping trip.  With 2 adults, 3 kids, and 2 boxers on a camping trip, there really isn't room for a full spread, but a few mini-muffins, some eggless cupcakes, some homemade caramel popcorn, and S'more kits worked wonders for the wilderness.
Favors consisted of a pouch and lanyard for each child to use while hiking.  Inside the pouches were crayons, pencils, notepads, magnifying glasses, and flashlights.

Thursday, April 26, 2012

Black Bean Salad with Corn, Red Peppers, Avocado, Jalepeno & Lime-Cilantro Vinaigrette

I saw this recipe on Pinterest, and it looked so good that I had to try it!  I tweaked it a bit, and below is my revised version.

Ingredients:
  • 2 15-ounce can black beans, rinsed and drained
  • 3 ears fresh corn, cooked, cooled and kernels cut off the cob, or 1-2 C frozen corn, thawed
  • 2 red bell peppers, diced
  • 4 cloves garlic, minced
  • 2 tablespoons minced shallots 
  • 2 teaspoons salt
  • ¼ teaspoon cayenne pepper
  • 2 tablespoons sugar
  • ¼ C extra virgin olive oil 
  • 6 tablespoons fresh lime juice
  • 1 teaspoon lime zest (be sure to zest limes before juicing them)
  • ¼  C chopped cilantro, plus more to garnish
  • 2 Hass avocados, diced
  • 1-3 fresh jalepenos, seeds and "white meat" removed, finely diced
Instructions:

  1. Combine all ingredients except avocados in a large bowl and mix well. 
  2. Cover and chill for a few hours or overnight. 
  3. Right before serving, add avocados and mix gently, being careful not to mash avocados. 
  4. Garnish with a few sprigs of freshly chopped cilantro if desired.  (I'm not a fan of cilantro, so I keep it to a minimum.) 
  5. Serve at cold or at room temperature.  It can easily be served as a dip or as a salad on a bed of Bibb or Butter Lettuce.

Wednesday, April 25, 2012

Sicilian Casserole


Sicilian Casserole

My cousin, Nicole, asked me for a pasta and sausage casserole recipe this morning and said she couldn't find it on the blog.  I searched, and to my surprise, I never posted this!  I'm still searching for the picture since he made it the first time in the summer of 2010.  We froze one of the casseroles, and we had it for dinner on his first day of Kindergarten.  (Too bad I didn't realize it wasn't posted when Breckin made this LAST week.)

This was the first meal for our oldest son, Breckin, to cook by himself at age 6. It's not the healthiest meal that we eat, but everyone loves it.  It's a nice treat.  Our twins devour this dish and have since the first time they had it at age 1.  Enjoy!

Prep Time: 15 mins                             Total Time: 45 mins

1 lb Italian sausage, casings removed (I use half mild or sweet and half spicy)     
1 onion, chopped
1 green bell pepper, chopped                                                             
1 (6 ounce) can tomato paste
1 (8 ounce) can tomato sauce                                                         
3/4 cup chicken stock (or water)
1/2 teaspoon dried Italian seasoning                                              
2 cups elbow macaroni (we actually use Gemelli instead of macaroni)
8 ounces cream cheese, cubed                                                          
3/4 cup milk
1/3 cup sour cream                                                                             
3/4 cup grated parmesan cheese, divided

  1. Preheat oven to 350 degrees. Brown sausage, onion and pepper in saucepan. Cook until sausage is done. Drain well.
  2. Add tomato paste, tomato sauce, water, and dried Italian seasoning and stir well to blend.
  3. Let simmer for 10 minutes.
  4. Meanwhile, cook pasta as directed on package. While pasta is cooking, combine cream cheese and milk in medium bowl. Cook in microwave on medium power for 2-3 minutes, stirring once halfway through cooking. Remove from microwave and stir with wire whisk until sauce is smooth.
  5. Drain noodles and add to cream cheese sauce along with sour cream and 1/2 cup Parmesan cheese; stir.
  6. In 2 quart casserole dish, place all of cream cheese mixture. Top with all of the sausage mixture and sprinkle with remaining 1/4 cup Parmesan cheese.
  7. Bake at 350 degrees for 20-30 minutes until casserole is bubbly.

**To freeze, add 1 tablespoon cornstarch to the cream cheese sauce. Prepare casserole as directed, except instead of baking, chill in refrigerator. Wrap well and freeze up to 3 months.
To thaw and reheat, thaw casserole overnight in refrigerator.
Bake, covered, for 25-35 minutes 5 minutes longer until bubbly.

Tuesday, October 18, 2011

Granola Popcorn Balls

A few years ago, I started experimenting with my popcorn ball recipe.  I found some pumpkin spice granola at our local grocery store in the health food "bulk" section.  It made to-die-for popcorn balls.  This year, we can't seem to find the pumpkin spice granola....So, reinvention of a "fall" recipe began.

Granola Popcorn Balls

Ingredients:

  • 3 1/2 quarts popped popcorn
  • 1 quart granola (pick your favorite flavor, or use plain and add seasonings)
  • 1 C light Karo 
  • 1/2 C molasses
  • 1 1/2 cups granulated sugar
  • 1 t Cinnamon
  • 1/8 t Ginger
  • 1/8 t Allspice
  • 1/8 t Cloves
  • 1/4 t Nutmeg
  • 2 T Vanilla

Instructions:

Grease a large 5-quart bowl. Mix popcorn with the granola. In a 2-quart saucepan (or larger), combine karo, molasses and sugar. Add seasonings as desired.  Boil over medium heat until temperature registers 260°, or to hard ball stage. Pour syrup evenly over popcorn mixture, and toss with a greased spoon to coat all popcorn and granola. Let mixture cool to the point you can handle it. Butter hands (or use Saran Wrap sprayed with cooking spray) and shape warm mixture into balls about the size of a tennis ball. Wrap in plastic wrap until ready to serve.
Makes about 18 granola popcorn balls.
 
Enjoy!

Wednesday, July 13, 2011

Dawn's Homemade Beer Bread

There's not much that makes me happier than fresh warm homemade bread.  With the extreme heat in Texas, my beer bread has been an easy fast bread to make!  Usually it takes longer to rise, but not this summer, and it's still just as delicious.  My husband LOVES this bread.  Loves it.  I love that it's yummy and so easy!  I can throw it together so quickly - sometimes as little as 2 hours from start to finish.  (Cold climates will take longer.)

Dawn's Homemade Beer Bread

Ingredients:
3.5 C all-purpose flour
1/4 C cooked brown rice (I make up a batch and then divide it up into ziplocs, and then I throw them in the freezer for future beer bread.)
3 T packed light brown sugar
1 T plus 3/4 t active dry yeast
2 T wheat flour
1.5 t salt
8-12 oz of strong beer, ale, or stout at room temperature (I place it in a warm water bath if I forgot to take it out ahead of time)
1/4 C milk or buttermilk at room temperature (Buttermilk can be made by using 1/3 T lemon juice and 1/4 C milk, let stand for 5 minutes)

Directions:
Mix all dry ingredients, including rice.  Add 8 oz. of beer and the milk.  Stir until combined.  Mix on medium speed with a dough hook until the dough comes together.  Add additional beer as needed.  Knead for about 10 minutes by hand or with dough hook until the dough is smooth and elastic. 

Add olive oil to the bowl and turn the dough to coat.  Cover with lightly oiled plastic wrap and set in a warm place (73-90 degrees) to rise until doubled in volume.  (In warmer weather, this can be 30 minutes.  In cooler temperatures, it can be an hour and a half.)

Grease a standard size loaf pan.  Punch down the dough; form into a loaf shape and place in the pan seam-side down.  Cover with oiled plastic wrap and set in a warm place to rise until doubled in volume.  Same times apply as the 1st rise.

Preheat oven to 350.  Bake loaf until the crust is golden brown and the bottom sounds hollow when tapped, 35-45 minutes.  Remove loaf from pan, coat top of loaf with melted butter and let cool.

Enjoy!

Sunday, April 17, 2011

Halibut or Mahi in Parchment

My husband has been out of town on business all week, and I hadn't felt well for the last 36 hours.  The thought of making dinner for his return left me completely uninspired (and often nauseous.)  As I sat in the carpool line to pick up our oldest from school, I flipped through a Real Simple magazine.  I found an ad for their new Real Simple recipe app.  I have a recipe app that I love, but my Droid phone ate it, and they're still trying to figure out the glitch.  So I was desperate.  I used ScanLife to scan the encrypted square.  $5 for an app that I didn't know if I'd even want long term seemed like a lot, but if I didn't like it, I could "return" it within 15 minutes.  Well, within 2 minutes, I'd found the perfect recipe.  Quick. Easy. Healthy. Full of things my husband loves.


Asian-style White Fish in Parchment Ingredients
Adapted from Real Simple recipe By Kate Merker,  December 2006

  • 1 small head bok choy, thickly sliced, or 4 baby bok choy, ends trimmed
  • 1 red bell pepper, thinly sliced lengthwise
  • 4 6-ounce halibut, mahi, or other firm white fish fillets
  • 1/2 teaspoon black pepper
  • 3 scallions (white and green parts), thinly sliced on a diagonal
  • zest from 1/2 orange, cut into matchstick-size strips
  • 3 tablespoons low-sodium soy sauce
  • 1 1/2 teaspoons rice vinegar
  • 1 1/2 teaspoons sesame oil
  • 2 teaspoons grated gingerroot

Directions

  1. Heat oven to 400° F. Tear off four 15-inch squares of parchment paper or aluminum foil and arrange on 2 baking sheets.
  2. Divide the bok choy and bell pepper evenly among the squares, place the halibut fillets on top, sprinkle with black pepper, and top with the scallions and zest.
  3. In a small bowl, combine the soy sauce, vinegar, oil, and ginger. Spoon the mixture evenly over the halibut.
  4. Top each fillet with another square of parchment or foil and fold the edges over several times to seal. Bake for 15 minutes.
  5. Transfer each packet to a plate. Serve with a knife to slit open the package. Be careful of the steam that will escape.
We all loved it.  I'll definitely make it again.  I may do them in one large parchment pocket instead of individual ones next time if I'm only making it for our family.  It makes for a fun presentation if you're serving it to guests, but we don't really want all of the paper on our plates anyway.  One large parchment pocket would use less parchment.  I served it along with coconut rice (white rice made with 1 C rice, 1 C water, and 1 can low-fat organic coconut milk.)  My 6 year old said he didn't care for the rice.  Although, he has started critiquing ALL of my meal preparations in recent weeks, and I don't know how much of it is sincere.  We have always encouraged an open dialogue at meal time regarding things we love, things we like, and things we "don't care for."  (We've tried to nix "I don't like ___.")  It also means that our kids try EVERYTHING we feed them so that they can participate in the conversation.  They can also mix items on their plates to determine if certain combinations are more appealing.  All said and done, this recipe is a winner, and my oldest may get "plain white rice" with his next time if I have any leftover from another meal.  (I don't "short order cook" anything for any of our family members - 1 meal is served during each meal time.)

Thursday, February 3, 2011

Oreo-Stuffed Chocolate Chip Cookies.

I saw this recipe on Sing For Your Supper, and although I'm not a "cookie eater", my husband LOVES ice cream sandwiches made with big cookies.  I knew I just had to make these.  I made them without eggs and used the flax seed and water egg replacement.  The dough was very crumbly and made it difficult to manage, but I wanted our littlest guy to be able to eat them, too.  If I were to make them eggless again, I would probably add more butter to help keep them moist.
It didn't make 2 dozen for me, but we didn't need all that it did make.  These are an indulgence, not something you want to eat daily.  I will admit that I cut a cookie into quarters, and I did sample them.  They were yummy right out of the oven.  Beyond that, I let the rest of the family enjoy them.

Oreo-Stuffed Chocolate Chip Cookies
-Picky Palate
2 sticks softened butter
3/4 cup packed light brown sugar
1 cup granulated sugar
2 large eggs
1 tablespoon pure vanilla
3 1/2 Cups all purpose flour
1 teaspoon salt
1 teaspoon baking soda
10 oz bag chocolate chips
1 bag Oreo Cookies
1.  Preheat oven to 350 degrees F.   In a stand or electric mixer cream butter and sugars until well combined.  Add in eggs and vanilla until well combined.
2.  In a separate bowl mix the flour, salt and baking soda.  Slowly add to wet ingredients along with chocolate chips until just combined.  Using a cookie scoop take one scoop of cookie dough and place on top of an Oreo Cookie.  Take another scoop of dough and place on bottom of Oreo Cookie.  Seal edges together by pressing and cupping in hand until Oreo Cookie is enclosed with dough.  Place onto a parchment or silpat lined baking sheet and bake cookies 9-13 minutes or until cookies are baked to your liking.  Let cool for 5 minutes before transferring to cooling rack.
Makes about 2 dozen VERY LARGE Cookies
 

Thursday, November 18, 2010

Lentils?

If you shop at Costco, you may have tried a sample, seen, or purchased Tasty Bite's Madras Lentils.  They're fantastic.  My 5 year old LOVED them in the store.  Four packets come in a box.  Each packet is 2 servings and takes only 90 seconds to heat in the microwave.  However, I know how much lentils REALLY cost, and I had a hard time paying the premium for the convenience of these truly yummy nutrient-packed lentils and red beans. 
Yesterday, I took it upon myself to create something similar that I could easily freeze in Ziplocs and pull out when I needed the "convenience." We were very pleased with the outcome.  The crockpot makes this even easier, although a few steps do require the stove.

Dawn's Madras Lentils
Ingredients:
1 can diced tomatoes
1 can tomato puree
1 can chicken broth
1 bag dried red kidney beans
1 T garlic olive oil
4 T butter or Smart Balance
1 finely minced onion
2 C lentils
2 T cumin
1 tsp. thai red curry paste
cayenne, to taste
chipotle chili powder, to taste
1/2 - 1 C cream (or Cacique Crema Mexicana)
Directions:
Soak beans according to package directions.
Place garlic olive oil, butter, and onions in a small skillet over medium heat.  Once the onions begin to soften, add the lentils and stir for another 2-3 minutes.  Salt as desired.
In a large crock pot, mix diced tomatoes, puree, chicken broth, pre-soaked beans and lentil/onion mixture.  Add 1 1/2 T cumin and Thai red curry paste.  Cook on high for 6 hours or on low for up to 12 hours.  Add chicken stock as needed.  I prefer mine to be thick like a chili, but some prefer it to be more like a stew.
Add remaining cumin, cayenne, and chipotle chili powder to taste.
Stir in cream, and serve!

post signature

Friday, October 22, 2010

Pumpkin Cream Cheese Muffins

I have been intending to make pumpkin muffins for about 3 days now.  This morning, I was determined to make them despite the madness in our home today (1 kid is sick, 1 has homecoming, the sheetrock/paint guys are coming to make some repairs, etc.)  I also decided to attempt these as an eggless recipe (replace each egg with 1 packet of plain gelatin and 2 Tablespoons of warm water.)  The muffins were amazing, BUT with the eggless option, they stuck to the wrappers (both silicone and paper) and created a "crust" almost where they touched the wrappers.  So, unless you MUST make them egg-free for allergy purposes, I would recommend using the eggs.  Next time, I will probably make the cream cheese portion egg-free and then split the muffin batter to do 1/2 with eggs and 1/2 without.
My little guy with the allergies was VERY anxious to have these out of the oven and in his mouth.  He ate 2 whole muffins, and I think he'll probably ask to eat them for lunch!  Happy 14 months, little man (and princess, too.)


Pumpkin Cream Cheese Muffins

adapted from AllRecipes

Ingredients:

Cream Cheese Topping
1 (8 ounce) package cream cheese
1 egg
1 teaspoon vanilla extract
3 tablespoons brown sugar
Streusel Topping
4 1/2 tablespoons white whole wheat flour*
5 tablespoons white sugar
3/4 teaspoon ground cinnamon
3 tablespoons butter
3 tablespoons chopped pecans
Muffins
2 1/2 cups all-purpose flour
1 cup white sugar
1 cup brown sugar
2 teaspoons baking powder
2 teaspoons ground cinnamon
1/2 teaspoon salt
2 eggs
1 1/3 cups canned pumpkin
1/3 cup olive oil
2 teaspoons vanilla extract

Directions:

Preheat oven to 375 degrees F (190 degrees C). Grease and flour 18 muffin cups, or use paper liners.
To make the filling: In a medium bowl, beat cream cheese until soft. Add egg, vanilla and brown sugar. Beat until smooth, then set aside.
For the streusel topping: In a medium bowl, mix flour, sugar, cinnamon and pecans. Add butter and cut it in with a fork until crumbly. Set aside.
For the muffin batter: In a large bowl, sift together flour, sugar, baking powder, cinnamon and salt. Make a well in the center of flour mixture and add eggs, pumpkin, olive oil and vanilla. Beat together until smooth.
Place pumpkin mixture in muffin cups about 1/2 full. Then add one tablespoon of the cream cheese mixture right in the middle of the batter. Try to keep cream cheese from touching the paper cup. Sprinkle on the streusel topping.
Bake at 375 degrees F (195 degrees C) for 20 to 25 minutes.

post signature

Tuesday, October 5, 2010

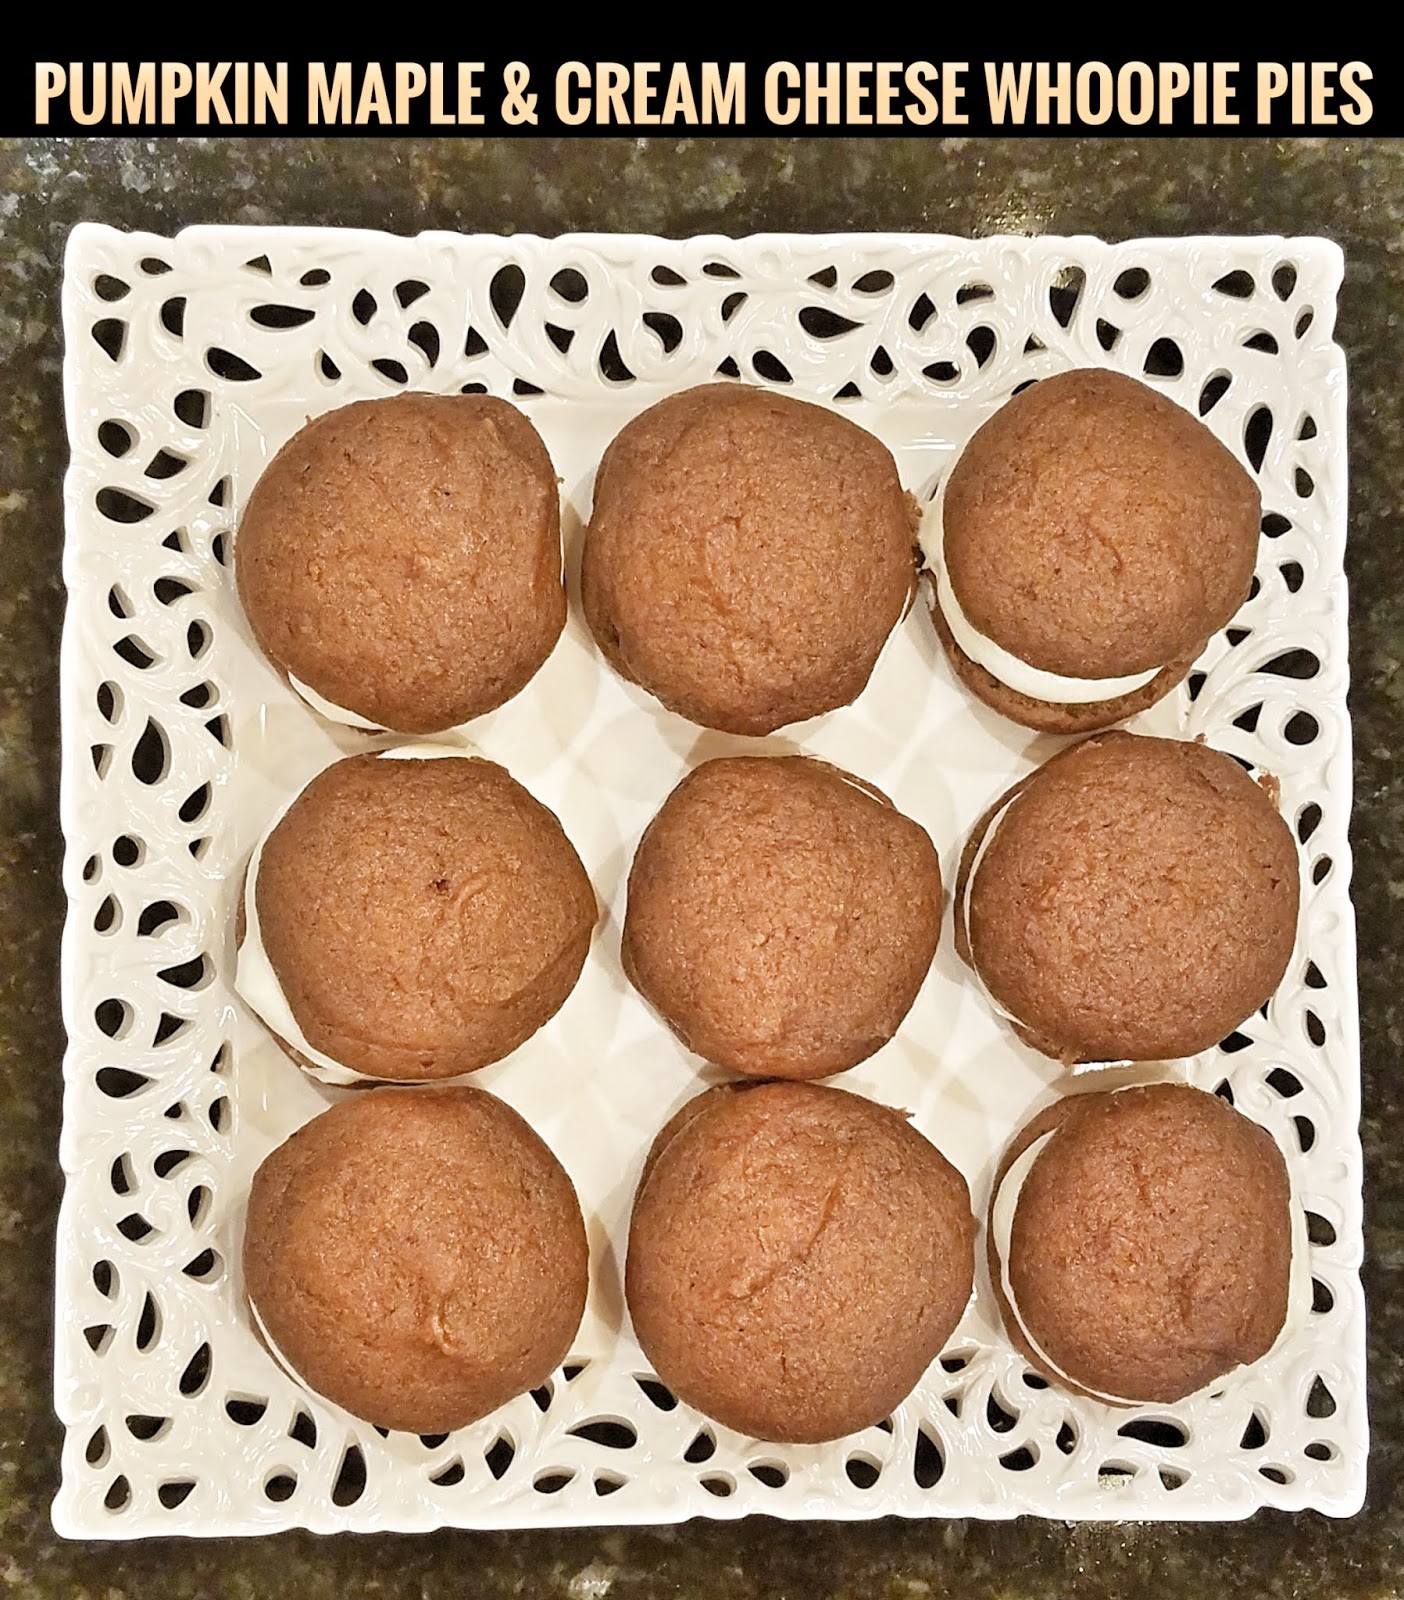
Pumpkin Maple and Cream Cheese Whoopie Pies

There seems to be a great deal of discrepancy as to where this particular recipe orignated, but it sounds so amazing, I *had* to make some today.  I promised to keep you posted as to whether or not I love them, hate them (not likely), or altered them (always a strong possibility.)

I will say that they are very good.  However, they needed adjustments.  It was way too much ginger for me; I cut the original recipe drastically.  I added cinnamon, allspice, and nutmeg to the filling (it didn't call for any of these), and I added a tad of nutmeg to the cakes.  I have also replaced the 2 eggs with 2 unflavored gelatin packets mixed with 1/4 C warm water (mixed just before adding it to the recipe) when we still had an egg allergy at home.
Tip: Spread the "cakes" into circles, because they don't "flatten" in the oven.
I usually make these once a year.  A pumpkin roll can serve the same purpose, and is much less labor intensive, but these little gems have become one of the first signs of fall in our home.
Made here with gelatin and warm water as an egg replacement.

Pumpkin Maple and Cream Cheese Whoopie Pies
Inspired by a recipe from Baked: New Frontiers in Baking

Cakes

3 c. all-purpose flour
1 tsp. salt
1 tsp. baking soda
1 tsp. baking powder
2 Tbsp. cinnamon
1/2 tsp. nutmeg
1 tsp. ground ginger
1/2 tsp. allspice
1 c. oil
1 c. dark brown sugar
1 c. white sugar
3 c. pumpkin puree
1 tsp. vanilla
2 eggs

Cream Cheese Filling

1/2 c. (1 stick) butter
1 8-oz. package cream cheese (you could use light)
3 c. powdered sugar
3 tablespoons maple syrup or 1/2-1 tsp. maple extract
1 tsp. vanilla
1/2 tsp. Cinnamon
1/4 tsp. Allspice

Preheat oven to 350.

Lightly spoon the flour into the measuring cup and level with a knife. In a medium bowl, whisk together the flour, baking soda, baking powder, salt, cinnamon, ginger, and nutmeg. Set aside. In a large bowl, beat together the brown sugar, white sugar, and oil. Add the pumpkin puree and mix well. Add the vanilla and eggs and mix well. Slowly add in the flour mixture and mix until combined.

Using a 1 tablespoon scoop or a 1/2 tablespoon measure, drop the batter onto a baking sheet (lined, if possible, but not necessary), leaving about 1" between the batter. Try to keep the batter as circular as possible. Bake for 10-14 minutes or until the tops are done and a toothpick inserted into the middle of one of the cakes comes out clean. Remove from oven and allow to cool for 5 minutes on the pan and then transfer to a cooling rack.

To prepare the filling, beat the butter on high for 1-2 minutes until smooth and fluffy. Add the cream cheese and beat until smooth. Add the powdered sugar, maple, and vanilla and beat until combined. Transfer to a large Ziploc bag and cut 1/2"-1" off the corner.

Flip the cakes over on a flat surface. Squeeze about 2-3 tablespoons of filling per large whoopie pie (less if you used a 1/2 tablespoon measure) onto every other cake. Top each pie with the remaining cakes. Serve immediately if possible; otherwise, these can be refrigerated in an airtight container. Makes about 30 large whoopie pies.


post signature