home categories contact about me store
This blog is part of at least one affiliate program. As an Amazon Associate I earn from qualifying purchases.
Showing posts with label allergy. Show all posts

Sunday, December 6, 2015

The VERY Best Gluten Free Waffles Ever (recipe)


After our family went Gluten-Free, our kids really missed simple treats (that were still only very occasional for our family) like waffles.  My waffle recipe below is sweet enough that you really don't need syrup!  You could certainly cut the sugar if you *need* syrup, confectioner sugar, or whipped cream.  Personally, I love these gems with some fresh fruit.  They have the perfect crunchy exterior with the soft fluffy middle.  They do work better in waffle irons that are "thicker" (like Belgian), but I've made them in a super thin waffle iron (almost the thickness of a pancake) and had RAVE reviews and repeated requests for the recipe.  Truth be told, this recipe came about in a search for a great waffle for Chicken & Waffles.  So...here they are, the VERY Best Gluten Free Waffles Ever. 
(I often double this recipe and make some to freeze for lunches and snacks.)

Ingredients
  • 2 cups Pamela's Artisan all-purpose flour (not an affiliate of LaIS)
  • 3/4 cup (scant) granulated sugar (If you want a less sweet waffle that is able to "take" syrup, try 1/3-1/2 C sugar.)
  • 3 teaspoons baking powder
  • 1 teaspoon baking soda
  • 1/4 teaspoon kosher salt
  • 2 large eggs, whites and yolks separated
  • 1  1/2 C milk
  • 1 T lemon juice
  • 1 cup unsalted butter, melted OR coconut oil (and I LOVE it if the coconut oil still has the coconut flavor for these waffles.)
  • 1 1/2 teaspoons clear Mexican vanilla (I use Danncy's - not an affiliate of LaIS)
  • 1 teaspoon cinnamon

Directions
  1. Preheat waffle iron.
  2. Place flour, sugar, baking powder, soda, cinnamon and salt into a large mixing bowl, stir to combine.
  3. Place egg whites into a medium mixing bowl, whisk continuously until stiff peaks form.
  4. Place milk, lemon juice, melted butter, Mexican vanilla and egg yolks into a large bowl, whisk to combine then slowly stir into dry ingredients. Once combined, fold in egg whites until just combined.
  5. Scoop 1/2 cup of batter and place into center of waffle iron, close lid and let cook until steam subsides and waffle is golden and crisp. Remove hot waffles and place on cooling rack. Continue cooking waffles until all batter is used.
  6. To serve, place waffles onto serving plates, top with fruit of choice and toppings.
Freaking amazing.  I made 2 batches tonight. 


Friday, August 29, 2014

School Lunch Ideas: Star Wars, Hello Kitty, & Back to School

If you have been following my blog for any length of time, you know that I LOVE the Laptop Lunch systems.  You'll notice that we have a ton of different bento containers, and although we use them for different purposes, I feel like the Laptop Lunch system is the best fit for our needs.
 
This week's lunches use a combination of Laptop Lunch and Arctic Zone Ultra containers.
Most of the picks, baran, and other décor items come from allthingsforsale.com.  The silicone cups are from grocery stores and World Market.
 
When packing lunches, it's important that you consider your "wet" and "dry" components and the containers you select for each so that your kids don't find soggy pretzels or crumb-filled applesauce.
 
These lunches are mostly the same, but the kids have slightly different preferences and allergies, so you may notice some inconsistencies.  It's on purpose.  They are all nut-free.
 
Lunch 1 - Star Wars & Hello Kitty
Top left: Dried and yogurt covered fruit with a light saber or Hello Kitty pick
Left: pretzels
Top Right: Tortillas with Wowbutter, honey, sliced bananas, and chopped apples (halved so they fit) with a Darth Vader ring or Hello Kitty
Fresh pear
Bottom Right: diced pineapple with a drone ring or Hello Kitty pick.
Bottom: String Cheese


Lunch 2 Apple / Back to School Theme
(Looking at the first lunch on the left)
Aussie apple (check here for instructions)
Top left orange silicone: Picante plantains with a chalkboard pick
Top right green silicone: animal crackers
Bottom left green silicone: grape tomatoes
Bottom right orange silicone: dried bananas with alphabet pick
Apple pick in the center of the container.
Gogurt, String cheese, granola bar.

Lunch on far right also contains a sandwich (using the inverted container to trim the crust) with a letter pick and hand-drawn apple using Wilton Food Writers.


Wednesday, August 13, 2014

Teacher Questionnaire - FREE Printable

As homeroom mom for a few years now, I mentioned to our PTO President at the end of last year that a standard "get to know you" info sheet from each teacher would be incredible - not just about them, their kids and pets, and their favorite color, but what about the best teacher gift they've ever received?

Here's the FREE printable download I've created for my kids this year.  I searched and looked at many of the printables that are out there, and this combines what I loved about each as well as few pieces of my own. 

Monday, October 21, 2013

Disney with Kids: Where are you staying? Hotel? Disney Resort? Condo? House? - Post 2

You know you're going to take the family to Disney, but you need to pick dates and book your "home away from home" for your stay.  Every family's needs and wants are different, and I certainly know that importance of convenience, the overall price tag, or other needs will impact the decision as to what is right for YOU.

Disney property:
You start doing the research, and the convenience of staying at a Disney hotel or resort sounds fabulous: free shuttles from the airport, free transportation to the Disney Parks, have some of your Disney purchases delivered to your room, extra Magic Hours, Magic Bands, early reservations for restaurants, and resort entertainment.  Then, you see the price tag, and you don't want to have to put a lien on your house to afford this magical experience.  The transportation between resorts and parks (no, you cannot just walk from one to the other) is sometimes slow.  The buses DO drop you off right at the front doors, so there is no parking and walking/shuttling to the entrance.  Disney is great about accommodating food allergies as well, but it can also be a hassle if you need to go through that routine 3-4 times a day for 4-8 days.  They try to make it as easy as possible, but outlining each person's needs for someone else at every meal just isn't "easy" if you have several food allergies and special dietary needs within the group.  This also isn't conducive to making meals in your room or putting the little ones to bed before the adults go to bed unless you pay for a suite which can be upwards of $2K per night - UNLESS you stay in a cabin at Fort Wilderness which is an amazing option. Ultimately, this didn't seem like the "right" choice for our family with the kids still being so small and traveling with another couple, but we are really looking forward to it for our next trip!
Disney World Grand Floridian
Rental home or condo:
With VRBO and HomeAway, there are SO many options for places to stay.  We have selected different homes around Disney during our trips, and we have found some homes and areas that we love.  There are some that are less than 5 minutes to the gates of each Disney Park.  Many have strollers available for you to use during your time there.  Some have Disney themed bedrooms for the kids (but still nothing like a TRUE Disney hotel themed room.)  Most have pools (and legally required locks for child safety.)  Having separate rooms for the kids, a full kitchen, multiple bathrooms, etc. all are high on our priority list. We found all of this in a 6 bedroom only 2 miles from Disney for 9 days for roughly $1,500 (a week was $1,240 in low season, $1,350 in mid season - when we went, and $1,530 in high season.)  We shared the home with some friends of ours, so it was only about $750 for each family for NINE days.  Look at the listing and make sure that it has reviews, read them, and be certain you are not the very first renters.  We have never had any issues, but it's good to do your research.  Not all of the homes are in the best neighborhoods.  In fact, some of the rental homes are in some sketchy areas.
You will also need a rental vehicle with a house/condo, and the Disney Park parking lots are huge (but very well marked.)  I would encourage you to take a picture of the lot name you park in each morning or write it down.  We really like the flexibility of a rental and leaving the stroller in the car at night, being able to run to the store, etc. 
The Princess room at the last home we rented.
Spreadsheet I use to compare potential properties (will work with hotels and resorts, too.)  We were considering traveling with 2 other families which would have made the 6 bedroom home only $463 per family.  I shared this spreadsheet with the other families so that we could find something that fit everyone's needs, and then we selected our place together.
Meals:
Having been to Disney before, we know how much our family can handle in a day and how many days we can go before we need a "day off."  We can do 2-3 days, and then we need an "off" day.
There is a Costco and several grocery stores, so come with your grocery list and meal plan to make it an easy stop upon arrival.  This is also a HUGE relief when you have little ones with food allergies; the constant stress of eating out for every meal is gone.
We had breakfast at the house every morning.  That left only 2 meals per day that would potentially be on Disney properties.
We packed lunches and snacks for most days.  I have a fold-flat insulated drawstring backpack that we ALWAYS take to Disney for lunches.  It's awesome, because it's a flat rectangle when not in use, but it can keep sandwiches or water bottles cold through lunch time.  One frozen bottle of water can act as your ice pack, and it can be the one you save for the latter part of the day.  You can find them on Amazon for about $10-$20.  If you don't want your sandwiches to get squished in a backpack, plastic pencil cases can hold 2 sandwiches.  We throw the whole thing in the "basket" under the stroller so fruits and crackers don't get beat up too badly.
With kids, snacks are a must! 
We eat a dinner or two at the house as well on days that we finish early or take a "day off."  Even if you don't love to cook, there are so many options for easy menu ideas that can save you a fortune when you want to really splurge on your other Disney Table Service meals while in the Parks

Character Meals:
As soon as you book your hotel/house/condo, figure out your preferred timeline and BOOK DisneyWorld character meals (here for Disneyland character meals) and Bibbidi Bobbidi Boutique makeovers in Magic Kingdom or Downtown Disney (here for Disneyland BBB.)  These book up WAY ahead of time, so if there's something you really want to do, book it early. You are able to book them 189 days before your trip if you are staying at a Disney property.  Even if you don’t get in when you call at first, keep calling! Set a reminder to call once a week in the months prior, and call daily the month of your trip.  Even while you are at Disney, call every day if you are looking for a specific reservation, because you may be able to get in.
*Please don't double book your meal reservations at multiple restaurants.  Although I completely understand that you don't truly know if you'll want Mexican food on Saturday night 6 months from now, when you book reservations at multiple restaurants, you take that opportunity away from other families.  Let's be respectful of others and spread the magic!  (Besides, now they charge you a fee for reservations that aren't cancelled 24 hours in advance.)
One thing we did on this last trip that I wish I had thought of sooner was to have the characters sign articles of clothing with their picture on it.  The characters will want Large pens or markers to hold, so be considerate of that even though small Sharpies are convenient for you, they aren't for puffy hands.  I digress....Our son was wearing a personalized Mickey Mouse shirt, and we had Mickey sign his shirt during our character meal.  You know exactly which characters you'll be meeting during that time, so it's a great opportunity to have them sign a shirt or hat or something that the kids can use often long after they return from Disney.  It also gives them something to show the character and "connect" during their meeting.  (More on personalized autograph books can be found here.  They were VERY well received by the characters and even allowed them to "talk" about "I remember you from last time!  You've grown SO much.")
The customized shirts the kids were wearing for the character meal (before Mickey came over.)
I bought them on Etsy - far left is Perry the Platypus, middle is Mickey Mouse, right is Minnie Mouse.
Once we had a general idea of where we were staying, we were able to plan out meals and create a budget.  This budget was more than generous for what we spent, but I prefer to err on the side of caution.  We didn't commit to reservations for all of our meals, but we knew how many meals we anticipated at home and how many at the parks.  Then, if the kids were "done" earlier than expected, it was okay.
Need to book?
If you haven't booked your Disney vacation yet, I would LOVE to help you!  I am an Authorized Disney Vacation planner (in addition to being a mom of 3 munchkins.)  You can check out my website or Facebook page to contact me.  
Next up - Disney with Kids: Preparation and Packing

Other Disney trip topics:
Travel
Where to Stay
Preparation & Packing
Autograph Books

All Disney posts.

Sunday, October 20, 2013

Disney with Kids Tips & Tricks: Travel - Post 1

As a mom of 3 kids (and crazy enough to take them all to Disney World at the ages of 7 and barely 3) and a planner, many of my friends and acquaintances call to ask me about tips and tricks for traveling to Disney. I'm determined to put it all in writing to share with all of you who are trying to prep for a Disney experience.  
I'm not going to tell you what the most current app is for finding out the wait times for rides are - there are plenty of places to research that (and I used several), but I am going to share with you little tips that can save you money and sanity.

A little about us that may give you some perspective into our trips.  The first time we went to Disney World, the twins were only a twinkle in God's eye, and our oldest was 3 and a half.  The first time we took the twins, they were barely 3, and one has sensory processing disorder and several food allergies.  
You may wonder why we didn't wait until we were absolutely certain that the kids would remember all of it?  We wanted them to be able to enjoy all of the magic with the innocence of small children, and they DID!  We have pictures of the wonder as our oldest met his favorite character, our daughter (having just learned to skip) skipping through the parks in her princess dress, and our little guy looking up in awe at Mickey and Pluto.  I'm so glad we didn't wait.  We will go back next year which will make them 5, 5, and 9, and they'll remember it all, but it will be a new and different experience for each of us - no doubt another that we'll treasure for other reasons altogether.
Dog-pile on Daddy while at the airport
Let's start with how are you getting there:  Driving?  Flying?
We fly to Disney (but we have made other long road trips in the same time frame, so I have tips for those, too.)  It was our first time to fly with the twins, and they all still required carseats.  We flew Southwest because we had several free flights because of airline miles, but it also meant that we needed to alert the airline about the peanut allergy and that we bring EpiPens on board.

EpiPens  (non-issue if driving)
Many experts will suggest that you do NOT run EpiPens through airport security scanners.  IF you need to bring EpiPens on the plane, I would highly encourage you to make sure that they are the ONLY item(s) that the person bringing the EpiPens through aiport security carries.  Ultimately, because it hasn't been scanned and contains a liquid, security will pat down the EP carrier AND go through ALL of their belongings.  Because we didn't realize this, I was carrying a backpack full of carefully packed items to entertain, feed, and treat the kids on the plane ride as well as my personal items.  So even after I was checks, my shoes were sprayed and tested, the EpiPens examined, all.of.my.bags.were.emptied.and.inspected.  Ugh.  So much for all of my careful planning and packing.  Note to self - do not EVER do that again.

Carseats (non-issue if driving)
If you do research regarding transporting carseats on airlines, you might find that they may suffer the same damage they would in a car accident.  When you've spent $250 per seat, you don't want to risk that kind of damage.  We wrapped them in bubble wrap, used packing tape, labeled them with our information, and tucked them each into an over sized trash bag used for yard debris.  Ours all came out just fine.  (I am not guaranteeing your results if you do the same.)

Stroller
My husband and I went back and forth on this.  I wanted to gate-check the stroller so that we could more easily navigate the airport with the kids.  He didn't want to hassle with it, and he wanted to check it at the curb.  Ultimately, we chose to check it at the curb, and we survived.  We knew before we left that we would take our Sit-n-Stand stroller and leave it at the home we were renting.  They had a couple of strollers there, but we really wanted a double stroller for the twins.  We didn't expect to use it again much except for trips to Disney, and if it's no longer there when we go back, we won't be heartbroken.  You can also rent strollers at Disney for the time that you are there.  They are expensive, but it can also save you the hassle in the airport.  You can also rent them from an off-property company that will even deliver them to/pick them up from your hotel/resort.  Even if your kids are big enough to not need a stroller, having one to haul around everyone's belongings is awesome!  Adding a couple of stroller straps can also be helpful, just be mindful of the sign you'll be using to identify it. (More on that in Preparation & Packing.)
Cake pans, reward tickets, games, magnets, and activity buckets for long road-trips

Activities
You know your kids better than anyone else, but consider bringing items that they have NOT used before.  Maybe a new coloring book or lap-sized chalkboard from the dollar store?  A cookie sheet or cake pan full of magnets, magnetic "paper" dolls, or other activity.  Cookie sheets and cake pans can be great for the car or a plane, because they help keep items from rolling off into the floor, and you can nest multiple pans for multiple kids before passing them out for the trip.  It's also possible to paint them with chalkboard paint (just make sure you get the paint that works for metal surfaces) to create yet another way they can be used - think Tic-Tac-Toe, artwork, etc.  Here is a list of free printables to create your own activity book.  Of course, we all know how convenient an iPad or smartphone can be when it comes to appeasing little ones, but we like to save those for the end of the trip when everyone is most restless. 

Rewards & Tracking
Regardless of if you're driving or flying, consider picking up or making little "rewards" (stickers, new magnets, Bingo game cards for the whole family, word searches, puzzle erasers - a favorite in our family, etc.)  These can be passed out at timed intervals for good behavior, and it breaks up the trip into manageable time frames for the little ones.  When driving, we have implemented a ticket system for long drives.  Every hour, we would pass out a ticket for good behavior during that time, and an "bonus" tickets could be rewarded at any time for sharing with each other, etc.  Then, every 2-3 hours, I would open the "store," and the kids could trade in their tickets for rewards from the goody bag.  On an airplane, it is easier to forgo the tickets and just pass out rewards as needed; the tickets are more cumbersome across plane aisles and rows.
In addition to the rewards, we tied a ribbon from the back of the car to the front of the car along the passenger side and attached a cardstock car to the ribbon with modified paperclips.  The ribbon was marked in equal measurements, and the paper car started at the very back end of our vehicle.  As each hour (or 50 miles or other measurement) passed, we moved the car along the ribbon to the next mark.  Not only did the kids enjoy watching our progress, but I even found that my husband would reference the moving cardstock car to see how much further we had to go.  This eliminated the "are we there yet?" and "how much longer?" questions.  It was AWESOME.  In response to those questions (which only happened early on in the trip,) I would respond, "Where is the car?"  Eventually, they would say, "MOM!  Look!  We are soooo far from home!"  or "We are more than half way there!"  Ah, happy mom.  

Snacks, Treats
Depending on the age of your little ones, what foods you allow, and what your family's needs are, this should be catered to your family.  When considering snacks and treats to pack for the actual trip, be sure to have something that can help with ear-popping (jelly beans, Starburst, baby bottle, fruit chews, etc.)  Be sure that your snacks are easily portable and that you have kid cups with lids, because the airline cups with lids do not pass muster when it comes to little ones.  

Sensory Processing Disorder
I made a ton of magnets with pictures of the different activities we would encounter and bought a small magnetic dry erase board to create daily schedules.  I taped a ziploc bag to the back of the dry erase board to hold the magnets.  It made it easier to help discuss the day and expectations as well as make changes to the schedule quickly if needed while still providing an easy visual reference.  
We brought the Listening Therapy mp3 player and special headphones, a weighted vest, weighted blanket for sleeping, a weighted Mickey Mouse (more on that in a post about preparation and packing,) and all of his paperwork from doctors and therapists.

Need to book?
If you haven't booked your Disney vacation yet, I would LOVE to help you!  I am an Authorized Disney Vacation planner (in addition to being a mom of 3 munchkins.)  You can check out my website or Facebook page to contact me.  

Next up - Disney with Kids: Where are you staying? Hotel? Disney Resort? Condo? House?

Other Disney trip topics (more to come):
Travel
Where to Stay
Preparation & Packing
Tickets, Schedule, & Parks
Packing List for Parks
Autograph Books

All Disney posts (including Elf on the Shelf ideas.)

Tuesday, October 5, 2010

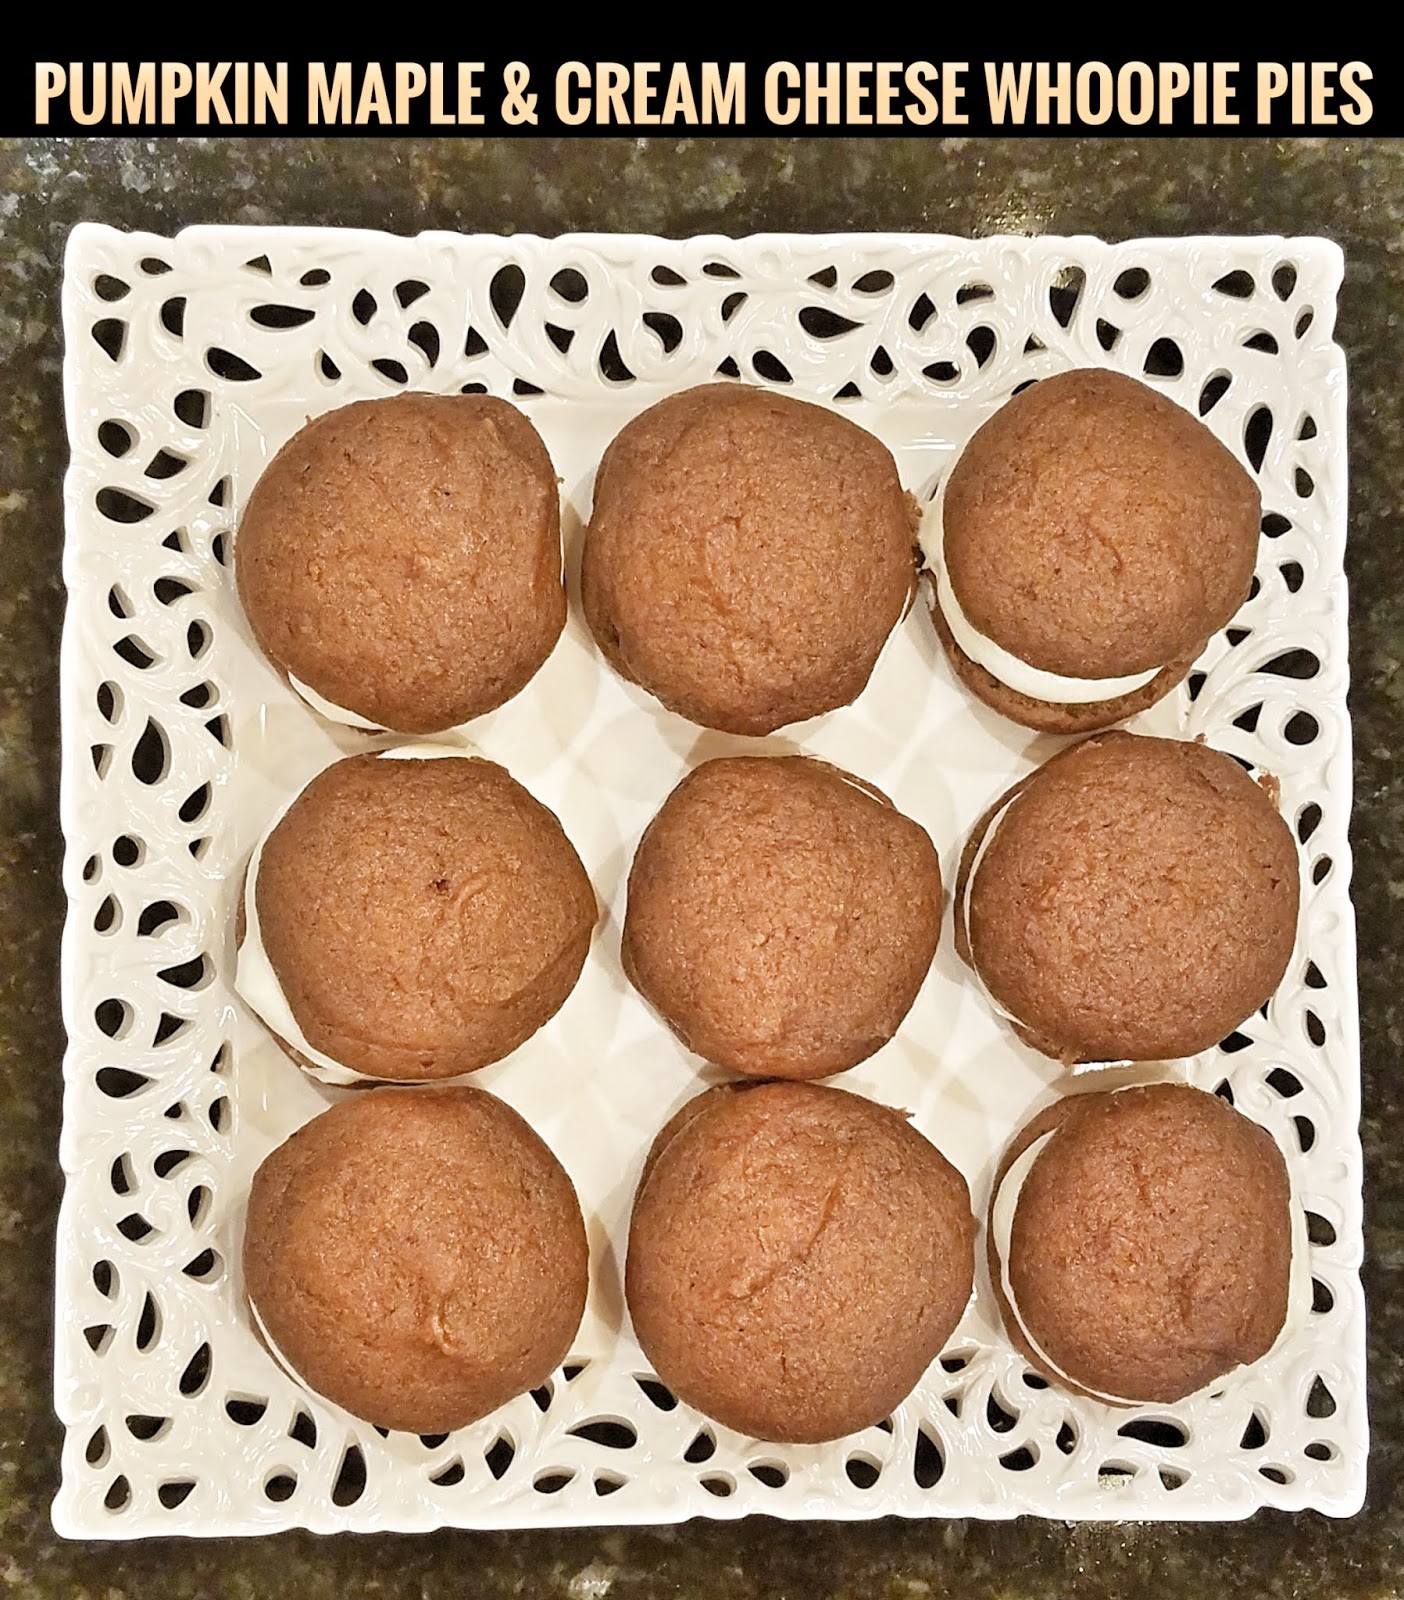
Pumpkin Maple and Cream Cheese Whoopie Pies

There seems to be a great deal of discrepancy as to where this particular recipe orignated, but it sounds so amazing, I *had* to make some today.  I promised to keep you posted as to whether or not I love them, hate them (not likely), or altered them (always a strong possibility.)

I will say that they are very good.  However, they needed adjustments.  It was way too much ginger for me; I cut the original recipe drastically.  I added cinnamon, allspice, and nutmeg to the filling (it didn't call for any of these), and I added a tad of nutmeg to the cakes.  I have also replaced the 2 eggs with 2 unflavored gelatin packets mixed with 1/4 C warm water (mixed just before adding it to the recipe) when we still had an egg allergy at home.
Tip: Spread the "cakes" into circles, because they don't "flatten" in the oven.
I usually make these once a year.  A pumpkin roll can serve the same purpose, and is much less labor intensive, but these little gems have become one of the first signs of fall in our home.
Made here with gelatin and warm water as an egg replacement.

Pumpkin Maple and Cream Cheese Whoopie Pies
Inspired by a recipe from Baked: New Frontiers in Baking

Cakes

3 c. all-purpose flour
1 tsp. salt
1 tsp. baking soda
1 tsp. baking powder
2 Tbsp. cinnamon
1/2 tsp. nutmeg
1 tsp. ground ginger
1/2 tsp. allspice
1 c. oil
1 c. dark brown sugar
1 c. white sugar
3 c. pumpkin puree
1 tsp. vanilla
2 eggs

Cream Cheese Filling

1/2 c. (1 stick) butter
1 8-oz. package cream cheese (you could use light)
3 c. powdered sugar
3 tablespoons maple syrup or 1/2-1 tsp. maple extract
1 tsp. vanilla
1/2 tsp. Cinnamon
1/4 tsp. Allspice

Preheat oven to 350.

Lightly spoon the flour into the measuring cup and level with a knife. In a medium bowl, whisk together the flour, baking soda, baking powder, salt, cinnamon, ginger, and nutmeg. Set aside. In a large bowl, beat together the brown sugar, white sugar, and oil. Add the pumpkin puree and mix well. Add the vanilla and eggs and mix well. Slowly add in the flour mixture and mix until combined.

Using a 1 tablespoon scoop or a 1/2 tablespoon measure, drop the batter onto a baking sheet (lined, if possible, but not necessary), leaving about 1" between the batter. Try to keep the batter as circular as possible. Bake for 10-14 minutes or until the tops are done and a toothpick inserted into the middle of one of the cakes comes out clean. Remove from oven and allow to cool for 5 minutes on the pan and then transfer to a cooling rack.

To prepare the filling, beat the butter on high for 1-2 minutes until smooth and fluffy. Add the cream cheese and beat until smooth. Add the powdered sugar, maple, and vanilla and beat until combined. Transfer to a large Ziploc bag and cut 1/2"-1" off the corner.

Flip the cakes over on a flat surface. Squeeze about 2-3 tablespoons of filling per large whoopie pie (less if you used a 1/2 tablespoon measure) onto every other cake. Top each pie with the remaining cakes. Serve immediately if possible; otherwise, these can be refrigerated in an airtight container. Makes about 30 large whoopie pies.


post signature