home categories contact about me store
This blog is part of at least one affiliate program. As an Amazon Associate I earn from qualifying purchases.
Showing posts with label nut-free. Show all posts

Monday, November 7, 2022

Bacon and Gruyere Popovers

Bacon and Gruyere Popovers 

My husband LOVES popovers.  After seeing some featured in an Austin restaurant on a food television show, we made reservations and tried theirs.  They were delicious, and he ordered a popover pan for me.  It only makes 6 at a time, so it isn't an easy quick breakfast or side dish for the masses.  My mom gave me a popover recipe around the same time, and I have modified it over the years.  This is the result....

Ingredients:
  • 4 large eggs, room temperature or warmed in a bowl of warm water
  • 2 T. melted butter
  • 1 1/4 C milk, warmed
  • 1 C flour OR 1 C gluten free flour & 1/4 t. xanthan gum
  • 1/2 t. salt
  • Gruyere, cut into small chunks. (Shredded cheese doesn't create the cheesy pockets in the popovers.)  I use about a teaspoon of cubes in each popover, but use as much or as little as you like.
  • Thick-cut Bacon, cooked and crumbled into chunks
  • Ground pepper as desired
Instructions:
  1. Preheat the oven to 400.
  2. Grease popover pan
  3. Whisk butter, milk, eggs, salt, pepper, and *xanthan gum (if using)
  4. Gradually sift and whisk flour into the batter until smooth.
  5. Place chunks of Gruyere in the bottom of each popover tin.
  6. Pour batter into each popover tin until 2/3-3/4 full.
  7. Add bacon to the top of each tin.
  8. Bake for 25 minutes at 400.
  9. Reduce heat to 350, and continue to bake for 15 minutes until deep brown.
  10. Remove from oven.
  11. If you don't want your beautiful popovers to collapse, simply use a sharp paring knife and pierce the bottom of the hot popovers to allow steam to escape and place them on a cooling rack. Do not let them cool in the pan, they'll lose their shape.
  12. Enjoy!
Bacon & Gruyere Popovers


Wednesday, November 4, 2020

Homemade Tomato Basil Soup & Tomato Basil Bisque


Our local warehouse store had 2 lb. clamshells of Campari tomatoes, and while I usually use San Marzano tomatoes for soup or bisque, these worked beautifully!

Cut 4 lbs of tomatoes in half.
Clean and slice a red bell pepper.

Add tomatoes, bell pepper, and 8 garlic cloves to a rimmed baking sheet (the tomatoes will render a lot of liquid) or cake pan.
Drizzle with olive oil & generously season with salt and pepper.  Roast the tomatoes, pepper, and garlic at 400 degrees for 45 minutes.
Slice 1 yellow onion and place in a pan on the stove top with 2 T butter.  Caramelize over low heat while tomatoes are roasting. 

Transfer tomatoes, pepper, garlic, and onion to blender or large pot to blend with an immersion blender. 
Add 1-2 Cups of broth to reach the consistency you want if you are keeping it as a soup and not a bisque.  If you are making a bisque, add 1 C of broth.
Add 1/2 Cup of packed fresh basil, and blend.
Add 1 Tablespoon of Oregano, and Salt & Pepper to taste.  I also added 1 clove of Black Garlic.  It's a sweet and savory addition to the soup.
This is what it looks like when you remove the husk. Blend it into the soup.
If you have a a Parmesan rind, toss it in as the soup simmers for some added flavor.  

Allow the soup to simmer over low heat for at least 10 minutes.


You can remove the Parmesan rind and serve the Tomato Basil Soup with a basil garnish, fresh cracked black pepper, and grated Parmesan.  (If you're like me, you're probably also going to serve it with a grilled cheese sandwich.)


If you wish to make it a bisque, stir in 1 Cup of heavy whipping cream before serving.

Homemade Tomato Basil Soup or Bisque

Ingredients:

  • 4 lbs. tomatoes

  • 1 red bell pepper

  • 8 cloves of garlic

  • 2 T butter

  • 1 whole onion

  • 1-2 Cups of broth (vegetable or chicken)

  • 1/2 C packed fresh basil

  • 1 t dried oregano

  • Salt & Pepper

  • 1 clove Black Garlic (optional)

  • Parmesan Rind (optional)

Directions:

  1. Cut 4 lbs of tomatoes in half.

  2. Clean and slice a red bell pepper.

  3. Add tomatoes, bell pepper, and 8 garlic cloves to a rimmed baking sheet (the tomatoes will render a lot of liquid) or cake pan.

  4. Drizzle with olive oil & generously season with salt and pepper.  Roast the tomatoes, pepper, and garlic at 400 degrees for 45 minutes.

  5. Slice 1 yellow onion and place in a pan on the stove top with 2 T butter.  Caramelize over low heat while tomatoes are roasting. 

  6. Transfer tomatoes, pepper, garlic, and onion to blender or large pot to blend with an immersion blender. 

  7. Add 1-2 Cups of broth to reach the consistency you want if you are keeping it as a soup and not a bisque.  If you are making a bisque, add 1 C of broth.

  8. Add 1/2 Cup of packed fresh basil, and blend.

  9. Add 1 Tablespoon of Oregano, and Salt & Pepper to taste. 

  10.  Add 1 clove of Black Garlic and blend.

  11. If you have a a Parmesan rind, toss it in as the soup simmers for some added flavor.  

  12. Allow the soup to simmer over low heat for at least 10 minutes.

  13. You can remove the Parmesan rind and serve the Tomato Basil Soup with a basil garnish, fresh cracked black pepper, and grated Parmesan.  (If you're like me, you're probably also going to serve it with a grilled cheese sandwich.)

  14. If you wish to make it a bisque, stir in 1 Cup of heavy whipping cream before serving.


Monday, November 2, 2020

Easy Pickled Peppers that are good on (almost) EVERYTHING!

You can use this recipe for ANY pepper!
Y'all!  A few months ago, I needed some pickled peppers for a recipe, and I realized we were out of jarred/canned pickled peppers.  <*Gasp* The horror!>  I sliced up and pickled a few fresh jalapeños we had on hand, and I LOVED THEM. Like, I never intend to buy pickled peppers again. 
We normally grow jalapeño, Serrano, and scotch bonnet peppers in our garden, but they have cross-pollenated the last few years making every pepper a "surprise Scoville mystery pepper."  This year, my husband picked up a Cowhorn Pepper plant that we have kept away from our gardens in its own container.  I had never had a Cowhorn.  
They are long skinny curved peppers that are green until they reach full maturity, but I love how pretty they are when I mix the red and green! 
Everything I've read puts them on par with an "average" jalapeño with regards to Scoville heat, but personally, we feel like they are hotter than most jalapeños - more like somewhere between a jalapeño and Serrano. 
They have great flavor, and when you pickled them with Rice Vinegar, Sugar, and Salt, they are so good on most ANYTHING! 
You can use this recipe to pickle any peppers that fit your personal heat preference. 

EASY PICKLED PEPPERS 

Ingredients:
Peppers, washed and sliced
6 T Rice Vinegar 
2 T White Sugar
1/2 t kosher salt 
Directions:
Mix all ingredients in a sealable container, seal, and refrigerate.


Tuesday, September 2, 2014

Bento: Pirates and Hello Kitty

Back at it after the long weekend!
Pirates and Hello Kitty themed lunches today.
PIRATES:
Fruit leather pirate ships (cut free hand - portholes are with a small round cutter)
Strawberries & blueberries with pirate hat rings.
Carrots & 2 kinds of tomatoes with pirate rings
HELLO KITTY:
Wilton Food writer drawn Hello Kitty on sandwich
Hello Kitty picks in fruit

Friday, August 29, 2014

Bento: Camping themed lunch box

With the long weekend ahead of us, camping inspired lunches seemed appropriate.  These are the Arctic Zone containers with the small Laptop Lunch containers for dipping sauce.
Sandwiches are decorated with apple fruit leather "tents", broccoli "trees", Colby Jack "fire", and pretzel "logs."  Carrot & celery sticks fill the bottom left container, and if you're camping, fishing is included, right?  So Goldfish fill the remaining container.
Happy Labor Day weekend!

School Lunch Ideas: Star Wars, Hello Kitty, & Back to School

If you have been following my blog for any length of time, you know that I LOVE the Laptop Lunch systems.  You'll notice that we have a ton of different bento containers, and although we use them for different purposes, I feel like the Laptop Lunch system is the best fit for our needs.
 
This week's lunches use a combination of Laptop Lunch and Arctic Zone Ultra containers.
Most of the picks, baran, and other décor items come from allthingsforsale.com.  The silicone cups are from grocery stores and World Market.
 
When packing lunches, it's important that you consider your "wet" and "dry" components and the containers you select for each so that your kids don't find soggy pretzels or crumb-filled applesauce.
 
These lunches are mostly the same, but the kids have slightly different preferences and allergies, so you may notice some inconsistencies.  It's on purpose.  They are all nut-free.
 
Lunch 1 - Star Wars & Hello Kitty
Top left: Dried and yogurt covered fruit with a light saber or Hello Kitty pick
Left: pretzels
Top Right: Tortillas with Wowbutter, honey, sliced bananas, and chopped apples (halved so they fit) with a Darth Vader ring or Hello Kitty
Fresh pear
Bottom Right: diced pineapple with a drone ring or Hello Kitty pick.
Bottom: String Cheese


Lunch 2 Apple / Back to School Theme
(Looking at the first lunch on the left)
Aussie apple (check here for instructions)
Top left orange silicone: Picante plantains with a chalkboard pick
Top right green silicone: animal crackers
Bottom left green silicone: grape tomatoes
Bottom right orange silicone: dried bananas with alphabet pick
Apple pick in the center of the container.
Gogurt, String cheese, granola bar.

Lunch on far right also contains a sandwich (using the inverted container to trim the crust) with a letter pick and hand-drawn apple using Wilton Food Writers.


Sunday, October 20, 2013

Disney with Kids Tips & Tricks: Travel - Post 1

As a mom of 3 kids (and crazy enough to take them all to Disney World at the ages of 7 and barely 3) and a planner, many of my friends and acquaintances call to ask me about tips and tricks for traveling to Disney. I'm determined to put it all in writing to share with all of you who are trying to prep for a Disney experience.  
I'm not going to tell you what the most current app is for finding out the wait times for rides are - there are plenty of places to research that (and I used several), but I am going to share with you little tips that can save you money and sanity.

A little about us that may give you some perspective into our trips.  The first time we went to Disney World, the twins were only a twinkle in God's eye, and our oldest was 3 and a half.  The first time we took the twins, they were barely 3, and one has sensory processing disorder and several food allergies.  
You may wonder why we didn't wait until we were absolutely certain that the kids would remember all of it?  We wanted them to be able to enjoy all of the magic with the innocence of small children, and they DID!  We have pictures of the wonder as our oldest met his favorite character, our daughter (having just learned to skip) skipping through the parks in her princess dress, and our little guy looking up in awe at Mickey and Pluto.  I'm so glad we didn't wait.  We will go back next year which will make them 5, 5, and 9, and they'll remember it all, but it will be a new and different experience for each of us - no doubt another that we'll treasure for other reasons altogether.
Dog-pile on Daddy while at the airport
Let's start with how are you getting there:  Driving?  Flying?
We fly to Disney (but we have made other long road trips in the same time frame, so I have tips for those, too.)  It was our first time to fly with the twins, and they all still required carseats.  We flew Southwest because we had several free flights because of airline miles, but it also meant that we needed to alert the airline about the peanut allergy and that we bring EpiPens on board.

EpiPens  (non-issue if driving)
Many experts will suggest that you do NOT run EpiPens through airport security scanners.  IF you need to bring EpiPens on the plane, I would highly encourage you to make sure that they are the ONLY item(s) that the person bringing the EpiPens through aiport security carries.  Ultimately, because it hasn't been scanned and contains a liquid, security will pat down the EP carrier AND go through ALL of their belongings.  Because we didn't realize this, I was carrying a backpack full of carefully packed items to entertain, feed, and treat the kids on the plane ride as well as my personal items.  So even after I was checks, my shoes were sprayed and tested, the EpiPens examined, all.of.my.bags.were.emptied.and.inspected.  Ugh.  So much for all of my careful planning and packing.  Note to self - do not EVER do that again.

Carseats (non-issue if driving)
If you do research regarding transporting carseats on airlines, you might find that they may suffer the same damage they would in a car accident.  When you've spent $250 per seat, you don't want to risk that kind of damage.  We wrapped them in bubble wrap, used packing tape, labeled them with our information, and tucked them each into an over sized trash bag used for yard debris.  Ours all came out just fine.  (I am not guaranteeing your results if you do the same.)

Stroller
My husband and I went back and forth on this.  I wanted to gate-check the stroller so that we could more easily navigate the airport with the kids.  He didn't want to hassle with it, and he wanted to check it at the curb.  Ultimately, we chose to check it at the curb, and we survived.  We knew before we left that we would take our Sit-n-Stand stroller and leave it at the home we were renting.  They had a couple of strollers there, but we really wanted a double stroller for the twins.  We didn't expect to use it again much except for trips to Disney, and if it's no longer there when we go back, we won't be heartbroken.  You can also rent strollers at Disney for the time that you are there.  They are expensive, but it can also save you the hassle in the airport.  You can also rent them from an off-property company that will even deliver them to/pick them up from your hotel/resort.  Even if your kids are big enough to not need a stroller, having one to haul around everyone's belongings is awesome!  Adding a couple of stroller straps can also be helpful, just be mindful of the sign you'll be using to identify it. (More on that in Preparation & Packing.)
Cake pans, reward tickets, games, magnets, and activity buckets for long road-trips

Activities
You know your kids better than anyone else, but consider bringing items that they have NOT used before.  Maybe a new coloring book or lap-sized chalkboard from the dollar store?  A cookie sheet or cake pan full of magnets, magnetic "paper" dolls, or other activity.  Cookie sheets and cake pans can be great for the car or a plane, because they help keep items from rolling off into the floor, and you can nest multiple pans for multiple kids before passing them out for the trip.  It's also possible to paint them with chalkboard paint (just make sure you get the paint that works for metal surfaces) to create yet another way they can be used - think Tic-Tac-Toe, artwork, etc.  Here is a list of free printables to create your own activity book.  Of course, we all know how convenient an iPad or smartphone can be when it comes to appeasing little ones, but we like to save those for the end of the trip when everyone is most restless. 

Rewards & Tracking
Regardless of if you're driving or flying, consider picking up or making little "rewards" (stickers, new magnets, Bingo game cards for the whole family, word searches, puzzle erasers - a favorite in our family, etc.)  These can be passed out at timed intervals for good behavior, and it breaks up the trip into manageable time frames for the little ones.  When driving, we have implemented a ticket system for long drives.  Every hour, we would pass out a ticket for good behavior during that time, and an "bonus" tickets could be rewarded at any time for sharing with each other, etc.  Then, every 2-3 hours, I would open the "store," and the kids could trade in their tickets for rewards from the goody bag.  On an airplane, it is easier to forgo the tickets and just pass out rewards as needed; the tickets are more cumbersome across plane aisles and rows.
In addition to the rewards, we tied a ribbon from the back of the car to the front of the car along the passenger side and attached a cardstock car to the ribbon with modified paperclips.  The ribbon was marked in equal measurements, and the paper car started at the very back end of our vehicle.  As each hour (or 50 miles or other measurement) passed, we moved the car along the ribbon to the next mark.  Not only did the kids enjoy watching our progress, but I even found that my husband would reference the moving cardstock car to see how much further we had to go.  This eliminated the "are we there yet?" and "how much longer?" questions.  It was AWESOME.  In response to those questions (which only happened early on in the trip,) I would respond, "Where is the car?"  Eventually, they would say, "MOM!  Look!  We are soooo far from home!"  or "We are more than half way there!"  Ah, happy mom.  

Snacks, Treats
Depending on the age of your little ones, what foods you allow, and what your family's needs are, this should be catered to your family.  When considering snacks and treats to pack for the actual trip, be sure to have something that can help with ear-popping (jelly beans, Starburst, baby bottle, fruit chews, etc.)  Be sure that your snacks are easily portable and that you have kid cups with lids, because the airline cups with lids do not pass muster when it comes to little ones.  

Sensory Processing Disorder
I made a ton of magnets with pictures of the different activities we would encounter and bought a small magnetic dry erase board to create daily schedules.  I taped a ziploc bag to the back of the dry erase board to hold the magnets.  It made it easier to help discuss the day and expectations as well as make changes to the schedule quickly if needed while still providing an easy visual reference.  
We brought the Listening Therapy mp3 player and special headphones, a weighted vest, weighted blanket for sleeping, a weighted Mickey Mouse (more on that in a post about preparation and packing,) and all of his paperwork from doctors and therapists.

Need to book?
If you haven't booked your Disney vacation yet, I would LOVE to help you!  I am an Authorized Disney Vacation planner (in addition to being a mom of 3 munchkins.)  You can check out my website or Facebook page to contact me.  

Next up - Disney with Kids: Where are you staying? Hotel? Disney Resort? Condo? House?

Other Disney trip topics (more to come):
Travel
Where to Stay
Preparation & Packing
Tickets, Schedule, & Parks
Packing List for Parks
Autograph Books

All Disney posts (including Elf on the Shelf ideas.)

Wednesday, October 2, 2013

Bento: October, Halloween, and Nut-free "Butterfinger"!

 I pulled down the Ziploc bag of Halloween pics, rings, etc. this morning!  The little man requested a ham and cheese sandwich, but they're always soggy if you make them ahead of time, so this is deconstructed.  The ham was patted dry and placed between the bread slices with a slice of cheese.  Lettuce (hiding a finger) and tomatoes are in separate containers.  Baby carrots (hiding a hand) and Gogurt are snacks, and the nut-free "Butterfinger" bite will be a special treat. (Nut-free "Butterfinger" = 1 jar Wowbutter + 1 lb. bag of melted candy corn mixed, cooled, cut + dip in melted chocolate.)  These are all tucked in Laptop Lunch containers with lids.

I'm sharing this one, not because I expect it to inspire you in any way, but rather to share my learning experience.  
The other day, we were running really late, so the Despicable Me minion is made with cheddar cheese and a food writer. (Our family is doing a Despicable Me theme for Halloween this year.) HOWEVER, I do NOT recommend trying to draw on cheddar.  I don't buy American cheese, because it isn't "cheese."  Unfortunately, American cheese is also a lot easier to decorate because of the moisture content.  I will be working on other Despicable me foods in the coming weeks, too.
Gogurt, fruit snacks, and a Nutri-Grain bar finish out this "we must go NOW" lunch.

Tuesday, October 5, 2010

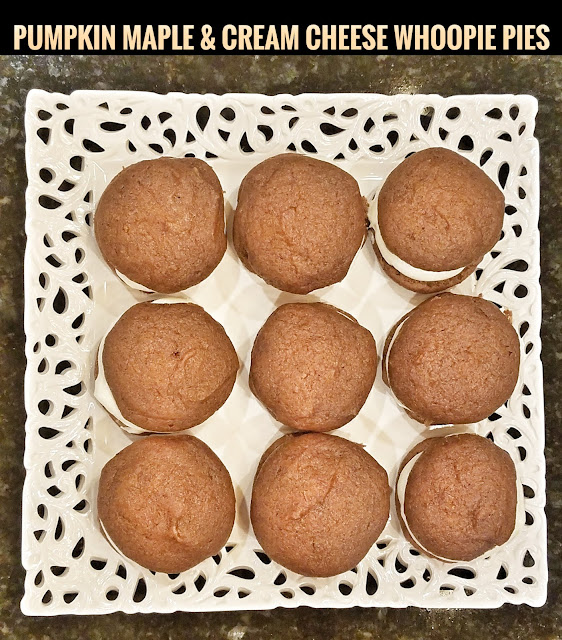
Pumpkin Maple and Cream Cheese Whoopie Pies

There seems to be a great deal of discrepancy as to where this particular recipe orignated, but it sounds so amazing, I *had* to make some today.  I promised to keep you posted as to whether or not I love them, hate them (not likely), or altered them (always a strong possibility.)

I will say that they are very good.  However, they needed adjustments.  It was way too much ginger for me; I cut the original recipe drastically.  I added cinnamon, allspice, and nutmeg to the filling (it didn't call for any of these), and I added a tad of nutmeg to the cakes.  I have also replaced the 2 eggs with 2 unflavored gelatin packets mixed with 1/4 C warm water (mixed just before adding it to the recipe) when we still had an egg allergy at home.
Tip: Spread the "cakes" into circles, because they don't "flatten" in the oven.
I usually make these once a year.  A pumpkin roll can serve the same purpose, and is much less labor intensive, but these little gems have become one of the first signs of fall in our home.
Made here with gelatin and warm water as an egg replacement.

Pumpkin Maple and Cream Cheese Whoopie Pies
Inspired by a recipe from Baked: New Frontiers in Baking

Cakes

3 c. all-purpose flour
1 tsp. salt
1 tsp. baking soda
1 tsp. baking powder
2 Tbsp. cinnamon
1/2 tsp. nutmeg
1 tsp. ground ginger
1/2 tsp. allspice
1 c. oil
1 c. dark brown sugar
1 c. white sugar
3 c. pumpkin puree
1 tsp. vanilla
2 eggs

Cream Cheese Filling

1/2 c. (1 stick) butter
1 8-oz. package cream cheese (you could use light)
3 c. powdered sugar
3 tablespoons maple syrup or 1/2-1 tsp. maple extract
1 tsp. vanilla
1/2 tsp. Cinnamon
1/4 tsp. Allspice

Preheat oven to 350.

Lightly spoon the flour into the measuring cup and level with a knife. In a medium bowl, whisk together the flour, baking soda, baking powder, salt, cinnamon, ginger, and nutmeg. Set aside. In a large bowl, beat together the brown sugar, white sugar, and oil. Add the pumpkin puree and mix well. Add the vanilla and eggs and mix well. Slowly add in the flour mixture and mix until combined.

Using a 1 tablespoon scoop or a 1/2 tablespoon measure, drop the batter onto a baking sheet (lined, if possible, but not necessary), leaving about 1" between the batter. Try to keep the batter as circular as possible. Bake for 10-14 minutes or until the tops are done and a toothpick inserted into the middle of one of the cakes comes out clean. Remove from oven and allow to cool for 5 minutes on the pan and then transfer to a cooling rack.

To prepare the filling, beat the butter on high for 1-2 minutes until smooth and fluffy. Add the cream cheese and beat until smooth. Add the powdered sugar, maple, and vanilla and beat until combined. Transfer to a large Ziploc bag and cut 1/2"-1" off the corner.

Flip the cakes over on a flat surface. Squeeze about 2-3 tablespoons of filling per large whoopie pie (less if you used a 1/2 tablespoon measure) onto every other cake. Top each pie with the remaining cakes. Serve immediately if possible; otherwise, these can be refrigerated in an airtight container. Makes about 30 large whoopie pies.


post signature