home categories contact about me store
This blog is part of at least one affiliate program. As an Amazon Associate I earn from qualifying purchases.

Thursday, December 15, 2011

Bento: Reindeer & Gingerbread Men

This Laptop Lunchbox (like yesterday's) is the Laptop Lunch box with 2 of the containers replaced with the one larger container from the Laptop Lunch Bento Buddy set.  (This larger box is also available in their salad set.)

  • The potato bread sandwich has a reindeer made with a cookie cutter (on the sandwich and the fruit leather for antlers), two raisins (poked in to stay with a chopstick tip), and a small circle cookie cutter from a bento cutter set from AllThingsForSale that's adhered with peanut butter for the nose.
  • Yogurt-covered raisins and raspberries are the festive "bed" for the sandwich.
  • Strawberries fill the smaller purple container, and a gingerbread man is made from remaining fruit leather and a cookie cutter.
  • The apple is also stamped with the gingerbread cookie cutter, and the skin is then removed with a very small paring knife.  The apple is treated with lemon juice, although, I don't know that it would have mattered if the gingerbread man turned a little brown.
  • The note is a free printable from Nourish Interactive


Wednesday, December 14, 2011

Bento: Snowman & Christmas Trees

This Laptop Lunchbox is paired with the large box from the Bento Buddy set which allows for the large sandwich.
  • Honey wheat bread sandwich with Frosty cut out using a cookie cutter.  The fruit leather hat was cut with the same snowman cookie cutter.  The small circle buttons and 1/2 circle eyes were made from fruit leather with a bento cutter set from AllThingsForSale.  His smile is a craisin cut in 1/2.  The Christmas trees are cut from the same piece of fruit leather with another cookie cutter.
  • Yogurt-covered raisins make "snow" beneath the sandwich
  • Mandarin oranges and the fruit leather "negative" are paired with gingerbread pics playing hide & seek.
  • Tomato slices and a snowman pic fill the last Laptop Lunch container
  • The note is a free printable from Nourish Interactive
  • String cheese fills the silverware compartment today.


Tuesday, December 6, 2011

Bed of Clouds: Pillow Sleep Pallet

I saw this on Pinterest.  (If you need an invite to Pinterest, comment with your e-mail address, and I'll send you one.  Warning: it is not  my fault if you spend endless hours on Pinterest when you should be doing other things.)
I looked at several different options, and honestly, I thought "Great idea!  Still a little room for improvement."  The best one I found was on Oopsey Daisy by guest blogger from 
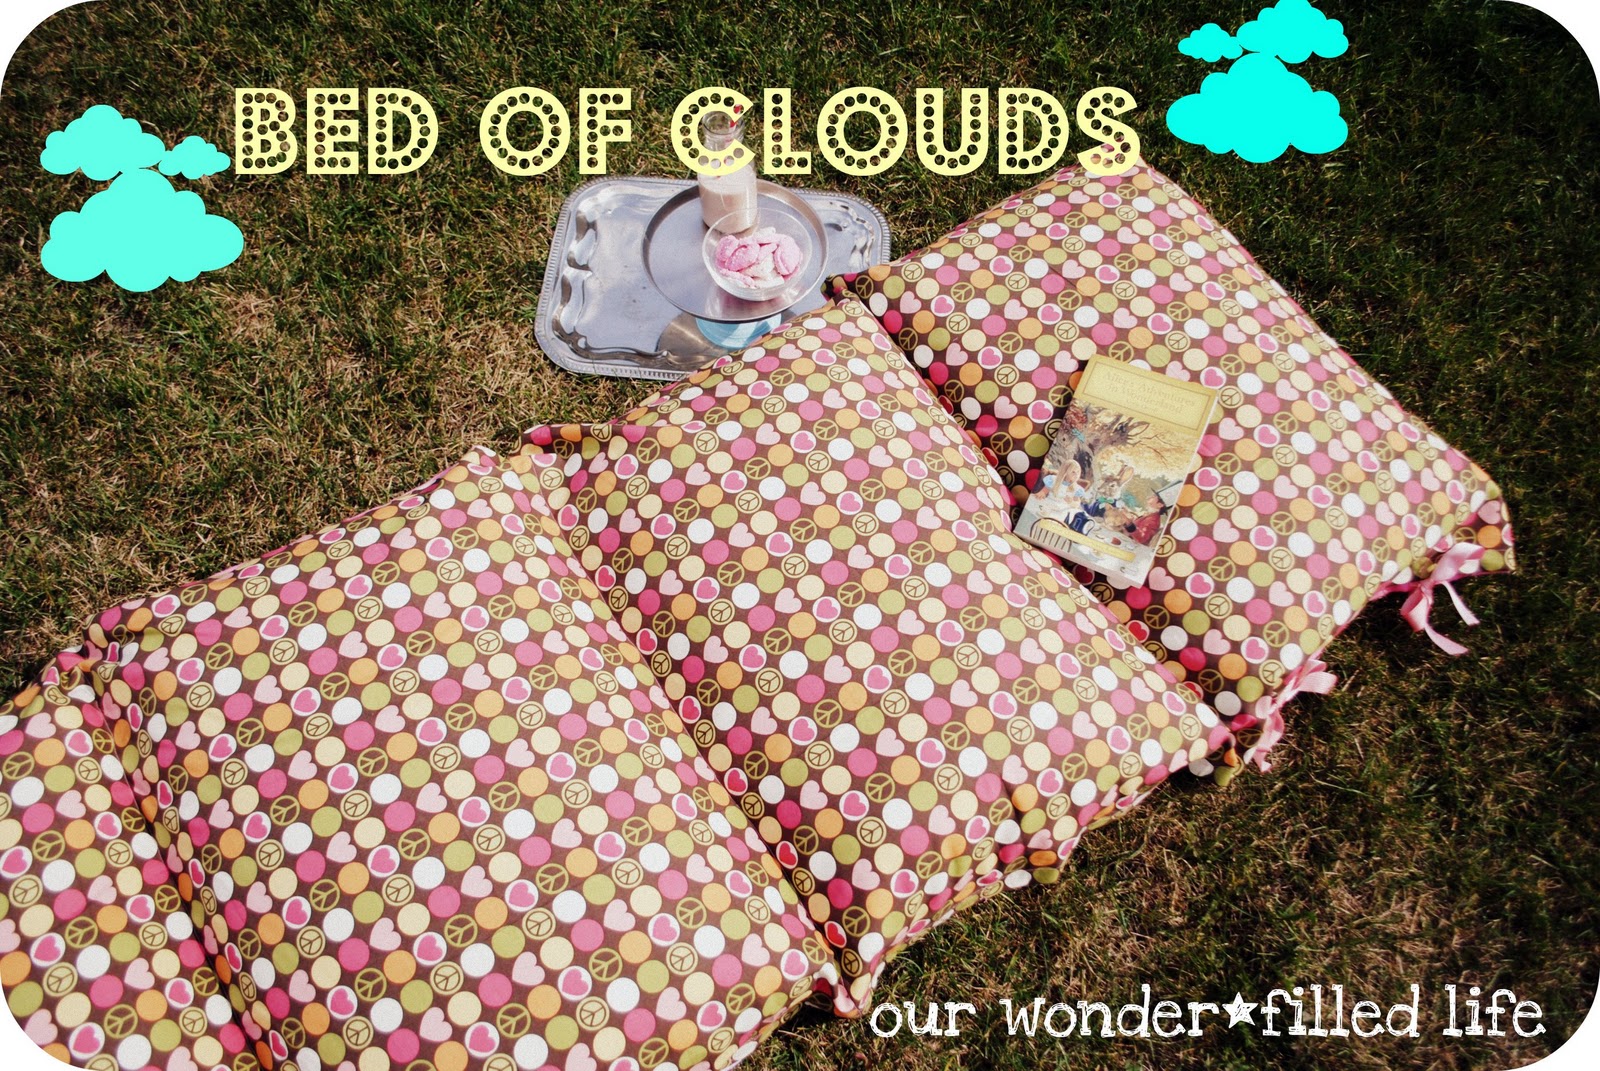
Our Wonder-filled Life.

I have a ton of these to make before Christmas....I've completed 3, and I have a minimum of 5 more to make.  Thank goodness they're quick and easy!  With a 6 year old and 2 year old twins, my sewing time is in VERY short and infrequent spurts, and I've managed to complete one a day thus far.

My modifications to Oopsey Daisy Our Wonder-filled Life's directions are as follows:

I bought 60 inch wide fleece, and I only needed 2 1/2 yards total per Bed of Clouds.  I mean, really, do you need 5 pillows high for a kid?  My 3 kids probably won't be using this when they're 5'8" or taller....So I decided that 4 pillows would be sufficient. (It requires less pillows and space when you try to store them, too.) The width of the fleece also meant that I didn't have to sew 2 pieces of fabric together, the "sealed" side was already done.

Now, you're doing the math and wondering why I needed 2 1/2 yards when it looks like 78-80" should be plenty (2 2/9 yards, or 2 1/3 yards at most places).  Well, I thought a pocket on the top pillow would be ideal for a book, ipod, phone, or whatever small items the kids didn't want to loose at night.  So there's a little extra fabric to cut off of the "top" of the fleece panel and use for the pockets.

I also embroidered names on the top "pillowcase" of each one. 

My directions are as follows:

Step 1: Measure and cut 79" of the fleece. 

Step 2: Pin & sew the long raw edges "under."  (These will be the opening side for the pillows to go in.)
Step 3: Determine the size you want your pocket to be using your "extra" fabric that you cut from the top.  Allow 1" for seam allowance along all 4 sides (2" more each direction total.)  Cut the pocket, pin edges under, sew the edges.

Step 4: Fold the long piece of fabric in half lengthwise.
Step 5: Measure 1 1/2 inches from the top of the long piece of fabric.  Place a pin on the folded edge.
Measure 19" down and place another pin; 19" down & another pin; 19" down & another pin; 19" down & a final pin.
Step 6: Take the pocket fabric and embellish it as you wish with any beads, ribbon, buttons, or embroidery.  Then place on the fold of the top "pillowcase."  My pockets are about 12-15" wide and about 5" tall when complete.  I centered them along the top "pillowcase" fold.  Remember to wrap the pocket under the fold, because when you insert the pillow, you want the pocket to be upright and not laying on top of the pillow.  Pin the sides and bottom of the pocket to the "pillowcase" and sew.
Step 7: Add any embroidery or other embellishments to the bed of clouds.  (I embroidered names on the top "pillowcase.")

Step 8: Turn the fabric "inside out" with the right sides facing each other and aligning the edges.  Pin along the very top and very bottom 1 1/2" from the edge.  Sew.  Reinforce with a second "pass."
Step 9: Turn right-side out.  Continue pinning at the three 19" marks all the way across the fabric to the openings.  Sew.  This creates 4 pockets.  Reinforce if desired.
 Step 10:  On the top "pillowcase," measure 6" from the top seam and 6" from the bottom seam and pin 12" of ribbon to the inside of each of the 4 marked spots.  Be sure to really reinforce these by sewing "squares" with "x's" inside them.  (They're really hard to see in the pictures, because the fleece hides it so well.)  Kids will be hard on this part.

Step 11: Do the same for the remaining 3 pillowcases with ribbon or sew-on velcro.

Step 12: Depending on how much fabric you purchased, you could easily create a little carrying bag for storage and transport.
Stuff with pillows & rest easy!

(Fabric.com and Hancock Fabric links are on the right sidebar of the blog.  Go Sew!)

Monday, December 5, 2011

Bento: Christmas Trees & Snow

This was a super fast and easy lunch to assemble.  Had I prepped the sandwich the night before, it would have been even easier to just pull from the fridge and pop in my little guy's lunchbox!

Today's Christmas Trees & Snow Laptop Lunch box is using a combination from the Laptop Lunch bento box set and the bento buddy set.  The buddy set has a container (with lid) that's big enough for a sandwich.

The left container has an apple butter and peanut butter sandwich with 2 trees (from cookie cutters) cut out.  The "trunks" of the trees are made from sesame sticks.  The trees were colored with Wilton Food Writers, and the snowmen pics are from something I found last year at the Dollar Store.  The "snow" beneath the sandwich is made from yogurt-covered pretzels and raisins.
The Red & Green theme in the 2 containers on the right is fulfilled with cucumbers and tomatoes also using snowman picks.
Happy lunching!

Thursday, December 1, 2011

Bento: Elf on the Shelf

You met our Elf on the Shelf yesterday....And he has revisited and assisted with lunch. 

The peanut butter and honey sandwich is in a regular sandwich box (found at a local grocery store) and cut out with a "Santa" cookie cutter.  He was colored with Wilton Food Writers and adorned with mini marshmallows cut into thin slices.

The grape tomatoes are in one of the inner boxes found in Laptop Lunch systems or buddy kits.

The sliced apples and the apple butter - caramel dip are in a Guataplast 2 Cup container that I bought a while back at The Container Store.

Fruit Leather was included for snack time.

Wednesday, November 30, 2011

Elf on the Shelf

Our Elf on the Shelf, Buddy Kringle, did a self-depiction in marshmallows last night.  He used my Wilton Food Writers on 2 large marshmallows and a mini marshmallow.  He seemed to be requesting hot chocolate, so we obliged....

Monday, November 28, 2011

Laptop Lunch Giveaway!

With all of the talk about Laptop Lunches on Learning As I Sew lately, I thought I should SHARE one with one of our blog friends!  I bought a Laptop Lunch Salad set just to giveaway. 
(Actual colors of interior containers are different than pictured below.)

MANDATORY ENTRY - Leave a comment here that you 'liked' us
Visit  Learning As I Sew on Facebook and 'like' us!
Optional: Feel free to visit Laptop Lunches on Facebook and 'like' them, say, "hi" and that Learning As I Sew sent you.

OPTIONAL ENTRIES - Leave one comment for each entry
2. Visit Laptop Lunch and tell us what is your "must-have"

3. Send us a picture of a lunch you made for yourself or your kids in a bento box.
dawn [at] ownfairygodmother [dot] com

3. Tweet this about this giveaway Enter to win a Laptop Lunch Salad Set #Giveaway from @fa1ry_godmother http://learningasisew.blogspot.com/

4. Post about this giveaway on your Facebook page, make sure to tag Learning As I Sew with a link to this page. http://learningasisew.blogspot.com/2011/11/laptop-lunch-salad-set-sale-coupon-code.html

5. Blog about this giveaway, make sure you link directly to this and leave the link in your comment.

6.  Grab my button for your  blog and leave your blog's link in your comment.

7.  Tell us your favorite Christmas lunch decor/design, your world-famous recipe, the best gift you've gotten, or anything Christmasy!

Giveaway is only open to U.S. residents and ends Sunday, December 11 at 11:59 p.m. PT. Winner will be chosen by Random.org, and announced on the blog and contacted by email. Winner will have 24 hours to respond otherwise an alternate will be chosen.

Friday, November 25, 2011

Marshmallow Snowmen

I made marshmallow snowmen using Wilton Food Writers for the kids' hot chocolate this morning. Welcome Christmas season!

Monday, November 21, 2011

Baby Bedding turned Teddy Bear

Here is an image of our oldest's bedroom nursery 6+ years ago in our last home.  You can't see the baby bedding very well, but I'm having a hard time finding a great picture of it "before."  Note to self for the next one...Take pictures before cutting it all up.  There was a red silk shantung bumper pad with antique cars.  The quilt was dark denim with a trim with ticking stripes and red satin ribbon.  The bedskirt has black and white plaid blocks, red silk shantung, and shimmery silver fabric.  He had a toddler chair that I had covered in the ticking strip fabric with a red silk shantung skirt.  Those pieces combined were plenty for more than one "project."
I cut it all up, and turned some of it into a bear for our son.  His full name is on the bear's right foot and his birthday on his left.  I hope to make 3 more for myself and his grandmothers.  I will do the same with the twins' nursery bedding when they get older.

Monday, November 14, 2011

Bento: Laptop Lunch

Yes, we love our Laptop Lunch system.  I even ordered a salad set for me last week (the sale was still valid when I checked this morning if you haven't grabbed one yet.) 
This morning, I didn't have a plan, theme, or even a real inspiration.  However, I know our 6 year old will eat everything in this box!  I still made the sections fun with just a few simple additions: a frog cupcake holder, 4 heart picks, and stealing a few of the SCRABBLE Cheezits to spell "E-A-T."  
The note at the top is "I'm Thankful for Healthy Foods!"  It's a free printable from Nourish Interactive.
  • Julienned carrots and dressing
  • A mini Rice Krispy treat (leftover from Halloween) & 4 yogurt covered pretzels
  • Cheezits - E-A-T
  • Frog shaped cupcake liner (from the clearance section of my grocery store) filled with dried cherries & potato bread with cheddar cheese and turkey cut in heart shapes with heart-shaped picks

Friday, November 11, 2011

Laptop Lunch Salad Set - Sale

Laptop Lunch salad sets, the lunch-packer's favorite, are priced at a steal this week! Fill the colorful containers with a balanced meal and pack them inside the exterior insulated sleeve to keep salads and sides fresh. This sleek design fits easily into your briefcase or backpack!! No need for an expensive salad bar. Save cash and eat well too!

Regularly: $31.18
Currently a steal at: $14.99 + a donation to local schools with coupon code "earleyfam"  (A portion of the proceeds will also be given to local schools with this particular code.)

I'm ordering mine today!  I've been eating more salads for lunch lately anyway, so this is PERFECT!

Saturday, November 5, 2011

Updated Fall Mantle

I finally found 2 vases for the sticks and leaves!  JoAnn Fabric had these rafia-wrapped glass vases on sale for 50% off, and I had a coupon for an additional 25% off. They're perfect.

Tuesday, October 25, 2011

Metal Letters & Numbers

Maybe you've seen the metal numbers and letters that I've been coo'ing over for a couple of years?  At first, I wasn't sure what letters I would want or even where I would put them....At $20 each, I knew that I didn't want to have to order too many.

My doll of a husband brought home some individual boxes (wine-crate-like) of candele lunghe Italian pasta, and it finally hit me.  In that really awkward small space above our extra tall upper kitchen cabinets, I could put pasta "crates" and the letters "E-A-T".  Really, $60 + taxes + shipping for three little letters???  Not so much. 
I had to find a way to do it for less...and I *did*!
Paper mache letters from Hobby Lobby or JoAnn Fabric + a couple of metalic paints from Home Depot or Lowe's?  Yes, please!

The pasta crates.  (The candele lunghe noodles are each as long as the box!)

Even though they aren't lower case letters, I absolutely love them.  I've already started thinking of ways that I can incorporate them into seasonal decor and possibly do some on the other side of the kitchen as well.  All said and done, each letter (depending on how much paint from each can I actually used) cost me about $3.50-$5.00 to make.  Even if I had emptied out both cans on the 3 letters, they would have been less than $9 each. I made a set out of thinner chip board letters as well for my sister.  If you can snag the letters when they are on sale for 40-50% off then, you could make them for about $2.50-$3.00 each!  If you're a big fan of the numbers that are found on everything right now, this would be an inexpensive way to add one to any part of your home!

Friday, October 21, 2011

Italian Flag Chicken

If you know me, then you know that I cannot *stand* to watch or hear Rachael Ray.  I'm not a fan of her cookbooks, either.  I'm not a food snob; although I certainly love food and appreciate really great food. 
I have a confession: Her magazine is starting to grow on me.  I don't know where the subscription came from; honestly, I thought it was a joke from a friend at first.  It keeps coming.  I pick it up. I flip through it.  I even *gasp* tried a recipe.
I saw a recipe for "Italian Flag Chicken" in her November magazine, and I altered it some.  I will say that I was happy with the results.  It was healthy and tasty.  Even our little people enjoyed it.

Italian Flag Chicken
adapted from Rachael Ray

Ingredients:
  • 1/2 onion diced & sauteed
  • 8 packed cups stemmed, thinly sliced kale
  • 14.5-oz. can diced tomatoes, drained
  • 3 oz. shredded fontina cheese
  • 1-2 T minced garlic
  • 1/2 t oregano
  • 1 t thyme
  • 6 large skinless, boneless chicken breasts (about 3 lbs.)
  • Salt and pepper
  • 2 T EVOO
  • 2 cans cannellini beans

Directions:

  1. Cook kale in pot of boiling, salted water for 5 minutes; drain and run under cold water. Squeeze dry or spin in a salad spinner and transfer to bowl; stir in tomatoes, garlic, thyme, oregano, sauteed onions, and cheese.
  2. Cut a deep pocket in center of each breast; stuff with kale mixture and season.
  3. Heat EVOO in skillet over medium heat; add chicken and cook about 10 minutes.
  4. Add the beans and any remaining kale mixture to the pan. 
  5. Cook until chicken registers 160 in the thickest part of uncut chicken breast. (Not the stuffing)

Thursday, October 20, 2011

Bento: Fall

Food Markers....I've seen some amazing things done with food markers on cheese, and so I finally broke down and ordered some Wilton Food Writers on Amazon.  I think this cheese had too high of a moisture content, because I struggled.  Regardless, I'm here to share my triumphs and what I am LEARNING as I sew, bake, cut, and create.  I'm going to try on Provolone next time and see how that works.

In the Laptop Lunch system:
  • Sandwich with fruit leather cut out and negative
  • Crackers with Cheese leaf cut outs (colored with Food Writers)
  • Yogurt covered pretzels
  • Dried pineapple
  • Mini rice crackers - my son prefers the apple cinnamon ones even over the caramel!

Wednesday, October 19, 2011

Bento: Pumpkins

Quick bento!  I've been without motivation lately.  This is still fun according to my 6 year old, but it only took an additional 30 seconds from packing a "standard" lunch without any "fun" elements.  Fruit leather cut outs and their "negatives" are used in every container.
  • Fresh peaches, silicone "grass" baran divider, carrots, Ranch dip
  • Mini rice cakes
  • Sandwich cut out in pumpkin shape, dried pineapple
  • Rice Crispy treat


Tuesday, October 18, 2011

Granola Popcorn Balls

A few years ago, I started experimenting with my popcorn ball recipe.  I found some pumpkin spice granola at our local grocery store in the health food "bulk" section.  It made to-die-for popcorn balls.  This year, we can't seem to find the pumpkin spice granola....So, reinvention of a "fall" recipe began.

Granola Popcorn Balls

Ingredients:

  • 3 1/2 quarts popped popcorn
  • 1 quart granola (pick your favorite flavor, or use plain and add seasonings)
  • 1 C light Karo 
  • 1/2 C molasses
  • 1 1/2 cups granulated sugar
  • 1 t Cinnamon
  • 1/8 t Ginger
  • 1/8 t Allspice
  • 1/8 t Cloves
  • 1/4 t Nutmeg
  • 2 T Vanilla

Instructions:

Grease a large 5-quart bowl. Mix popcorn with the granola. In a 2-quart saucepan (or larger), combine karo, molasses and sugar. Add seasonings as desired.  Boil over medium heat until temperature registers 260°, or to hard ball stage. Pour syrup evenly over popcorn mixture, and toss with a greased spoon to coat all popcorn and granola. Let mixture cool to the point you can handle it. Butter hands (or use Saran Wrap sprayed with cooking spray) and shape warm mixture into balls about the size of a tennis ball. Wrap in plastic wrap until ready to serve.
Makes about 18 granola popcorn balls.
 
Enjoy!

Friday, September 30, 2011

Bento: You make my world go 'ROUND!

Our kids have been asking for "cheeseballs" for months.  Our middle child is a self-professed "cheeseball", and it's a bit of a joke in our house.  A few months back, the kids saw a huge tub of cheeseballs at the store, and as always, I passed them by.  It's not something that we buy or feed our kids....until today.  It's not a new habit, but I did pick up a container when the kids saw them on our last trip to the store.  I decided to incorporate them into this lunch.  (Funny enough, although all 3 kids loved them and asked for more, once they were out of sight, none of them have mentioned them since!)  This is in the Laptop Lunch box.

  • Rice cake "peanut butter sandwiches"
  • Vanilla yogurt and raspberry jam with large black grapes
  • Tomatoes and homemade Ranch dressing
  • The infamous cheeseballs
  • I didn't have time to do anything cutesy for the theme, so I just wrote a note on his napkin to tie the theme together.

Thursday, September 29, 2011

Bento-ish: You are Top Banana & Apple of My Eye

Today's lunch didn't actually go INTO a bento box of any sort.  I used some of the bento containers to hold everything and then put them in a lunch bag....
I don't remember where I found the tags.  I printed out a ton at the beginning of the school year, and I can't seem to locate the original source.  If you want them, send a message to me, and I'm happy to send you the file that I had downloaded for free.

Clockwise from the top left:
  • Aussie apple (see below for cutting "diagram" and instructions)
  • Peanut butter, honey, and a dab of Nutella for apple and rice cake dipping
  • Apple Cinnamon mini rice cakes
  • Kale chips (made the night before)
  • PB&J
  • Banana - written on with pressure only

 Aussie apples are incredibly easy, easy to transport, prevent browning, and don't even dirty a container!  Make 4 slices:
The first one is the longest and goes across the apple near the core. (Horizontal long slice at the top in the picture.)
For the 2nd cut, you can place the apple on it's now "flat side", and cut just to the side of the core. (Vertical long slice on the left side in the picture.)
For the 3rd cut, flip the apple to the newest "flat side", and cut just to the side of the core. (Horizontal short slice on the bottom right of the picture.)
Finally, flip the apple to the newest "flat side", and cut the only remaining piece away from the core. (Vertical short slice on the right.)
Reassemble the apple and place a rubberband around it.
Surprisingly, all 3 of our kids love kale chips.  I was shocked.  I love them, but my husband could take them or leave them.  You peel all of the "veins" from a fresh bunch of kale.  (I make 2 bunches at a time.)  Rinse and thoroughly dry the kale.  Drizzle with olive oil and work through with your hands.  Yes, it's a little messy, but it will make your kale crispy without burning it.  Sprinkle with sea salt.  Bake for 20-35 minutes at 350. 

Wednesday, September 28, 2011

Bento: Something's Fishy

Today, I filled our 6 year old's Laptop Lunch lunchbox with fish.  Lots and lots of fish.
So, maybe they aren't exactly FISH, but they are fish-shaped.  I wrapped the apple box in plastic wrap and used the fish band (that we have for a different set of tiered bento boxes) around the apple container.
  • The peanut butter and spun honey sandwich on honey wheat bread is cut into fish shapes using a LunchPunch.  Some fruit leather fish surround the sandwiches; although, they're hard to see in this picture.
  • The boiled egg was made into a fish using a mold from AllThingsForSale.com
  • The apples were cut and then the fish shape was "punched" with a small cutter from a marine-themed package from AllThingsForSale.com
  • The pretzel and cheddar goldfish fill the last compartment in the Laptop Lunch system. (Get 10% off if you use the discount code: Earleyfam)
  • The additional container (from the dollar store) has vanilla yogurt mixed with strawberry jam and is covered with a piece of fruit leather and its cutouts. *same ones used for the apples.
Disclaimer: I am not paid for this blog post and I do not receive a portion of proceeds from AllThingsForSale.com or Dollar Store.  I do receive a portion of proceeds if you choose to purchase a LaptopLunch system with our coupon code "Earleyfam", and we donate 5% of those proceeds to local schools.

Monday, September 19, 2011

Checkerboard Lunch

Checkers anyone?

This Laptop Lunchbox is filled with interactive pieces.
Top left: grape tomatoes and ranch. 
Top right: sandwich cut in half and standing on sides covered with a carved piece of fruit leather (checkerboard) and a circle and "x" from the fruit leather pieces.  2 granola bars fill the gap.
Bottom left: Checkerboard apples (playing pieces are to the right.)
Bottom right: Yogurt & chocolate covered raisins

Update - He liked this interactive checkerboard lunch that he's asked for it multiple times since then....Just don't tell them that they can't play with their food.

Tuesday, September 6, 2011

Fall!

If you live in Texas, then you know that we all were afraid fall may never come.  The extreme heat combined with the worst drought we've ever had has been truly miserable.  This weekend's cooler weather inspired me to decorate for the new season that's on the horizon.  (It is September after all!)
The mirror is one that we've had for a while, and it's from Hobby Lobby, as is the old mirror that I put inside the fireplace.  The battery-operated candles (with timers) are from Target.  The new painting, "Poppies", is my newest purchase during last week's 50% off sale at Hobby Lobby.  I love the colors and knew it would be a good match for the mantle wall. 
I made the banner with burlap, twine and a paint pen.  I love that it's subtle, but still gives more depth and texture to the overall decor.  I tried to do it the "easy" way by using iron-on heat & bond.  Honestly, it would have been easier to sew the straight line on the burlap triangles.  (They were 9" wide and 12" tall when I started, and then I folded the top over the twine and trimmed the edges.)
I have some branches and leaves that I may or may not put in vases and flank the mantle.  I just haven't found vases that I love yet....

Thursday, September 1, 2011

Bento: Crinkle Cutter

Our son got a new lunchbox this year, and although it's "cool", the Laptop Lunchbox system doesn't fit as well in it as it does in last year's box.  He REALLY likes the Laptop Lunches though, so he's willing to have the old lunchbox regularly.
It's amazing what "crinkle-cut" can add to a lunch in the eyes of a child.  Today's Laptop Lunchbox (use code Earleyfam for a discount) is filled with crinkle-cut items.  (I used a crinkle cutter from Pampered Chef that's sharp enough to cut through raw carrots with ease.)
The top left compartment has grape tomatoes with a couple of pics from AllThingsForSale.com, light ranch dressing, and crinkle-cut carrots in a silicone cupcake "flower" from World Market.
The second compartment is the dip (or "ketchup") for the "fries."  However, I also included a spoon in case he wants to eat the Light Vanilla Yogurt and Raspberry Preserve mix by itself.
The bottom right is full of crinkle-cut apples.
The bottom left is a honey-wheat sandwich with almond butter, grape jelly, and spun honey.

Monday, August 29, 2011

Orange Bento

We are a week into this school year, and although I packed lunches all last week, I didn't get one picture of any of them. 
The note says "Orange you glad I packed your lunch?" 
I made the note in Word last night after searching for fun inspiration on lunchbox notes.  I didn't find one that was applicable, but I did find several that I'll share soon!
I used the Laptop Lunch system and included:
  • Carrot sticks and Ranch dressing
  • Goldfish
  • A sandwich with almond butter, spun honey, bananas, and apricot fruit leather decor
  • Mandarin oranges
  • and canteloupe in an additional container from Container Store

Saturday, August 27, 2011

Grilled Broccoli & Cheese

With several food allergies and some finicky-ness, lunch can be one of the trickiest meals of the day for me.  All of my kids LOVE broccoli, but it hadn't occurred to me until this week to put it in a grilled cheese!  I used leftover steamed broccoli, chopped it, and added it to a "standard" grilled cheese sandwich.  This allows for a protein/dairy, vegetable, and grain all in one neat package without any food substitutions or tricks.  They all loved it, and so did I!  I ate one, too.

Wednesday, July 13, 2011

Dawn's Homemade Beer Bread

There's not much that makes me happier than fresh warm homemade bread.  With the extreme heat in Texas, my beer bread has been an easy fast bread to make!  Usually it takes longer to rise, but not this summer, and it's still just as delicious.  My husband LOVES this bread.  Loves it.  I love that it's yummy and so easy!  I can throw it together so quickly - sometimes as little as 2 hours from start to finish.  (Cold climates will take longer.)

Dawn's Homemade Beer Bread

Ingredients:
3.5 C all-purpose flour
1/4 C cooked brown rice (I make up a batch and then divide it up into ziplocs, and then I throw them in the freezer for future beer bread.)
3 T packed light brown sugar
1 T plus 3/4 t active dry yeast
2 T wheat flour
1.5 t salt
8-12 oz of strong beer, ale, or stout at room temperature (I place it in a warm water bath if I forgot to take it out ahead of time)
1/4 C milk or buttermilk at room temperature (Buttermilk can be made by using 1/3 T lemon juice and 1/4 C milk, let stand for 5 minutes)

Directions:
Mix all dry ingredients, including rice.  Add 8 oz. of beer and the milk.  Stir until combined.  Mix on medium speed with a dough hook until the dough comes together.  Add additional beer as needed.  Knead for about 10 minutes by hand or with dough hook until the dough is smooth and elastic. 

Add olive oil to the bowl and turn the dough to coat.  Cover with lightly oiled plastic wrap and set in a warm place (73-90 degrees) to rise until doubled in volume.  (In warmer weather, this can be 30 minutes.  In cooler temperatures, it can be an hour and a half.)

Grease a standard size loaf pan.  Punch down the dough; form into a loaf shape and place in the pan seam-side down.  Cover with oiled plastic wrap and set in a warm place to rise until doubled in volume.  Same times apply as the 1st rise.

Preheat oven to 350.  Bake loaf until the crust is golden brown and the bottom sounds hollow when tapped, 35-45 minutes.  Remove loaf from pan, coat top of loaf with melted butter and let cool.

Enjoy!