home categories contact about me store
This blog is part of at least one affiliate program. As an Amazon Associate I earn from qualifying purchases.

Friday, March 30, 2012

Faux Rock

Multiple alcoves in our formal dining room haves stared at me since we moved in almost 3 years ago. They taunted me. 

I finally figured out what I would do with them.  (Two of the four are complete!)

Clear faux glaze + Mocha glaze + 2 tones of torn tissue paper = Faux rock alcoves!


Tear tissue paper (I used natural and white papers) into "bricks" with irregular edges.
Remove faceplates from outlets and light switches, and tape off the area.
Mix clear faux glaze and colored glaze as desired (uniformity is NOT necessary.)  I used Valspar's Mocha glaze.
Paint a layer of the glaze to cover a section large enough for about 4 "bricks."
Carefully place your first "brick" and glaze over it.  (Move your glaze outward around the edges so that you don't roll up or rip your tissue paper.)
Place your second brick either very near or slightly overlapping one edge of the 1st brick, and then glaze over.
I highly recommend tearing the paper to fit the space prior to glazing it in.  The glaze makes the tissue paper hard to handle, and then creating the right shape at the edges is near impossible.
Repeat until finished!
More pictures will follow once all 4 alcoves are complete.

Friday, March 2, 2012

Bento: Dr. Seuss

Happy birthday, Dr. Seuss!
In his honor...
An egg shaped like a car - could be for "places you'll go" or "green eggs & ham"
Goldfish - 1 fish, 2 fish (3 fish, 40 fish?)

Sandwich - Red fish, blue fish

Saturday, February 11, 2012

DIY Ruler

You've probably seen the adorable Pottery Barn Kids "ruler" to measure
growth....I wanted one.
I asked my Father in Law for one since he does wood work. I was expecting a
6' - 7' board with rounded edges. Instead, he created this amazing ruler!
He gave it to me "blank" along with a wood burning kit. As soon as I had it
in my hot little hands, I just had to get started. I had never done any
wood burning....
I printed the numbers out in Biondi font at 150 pt. I measured out the
board, and I traced over the numbers on top of the board to leave slight
indentions to give me a template on the wood. I will say that I'm no
wood-burning superstar, but I'm thrilled with the outcome! I originally
planned to put it in the kids' bathroom, but we like it so much, we hung it
in the front hallway where the kids' rooms are.
I'm doing "columns" so to speak for each of the kids to help keep it looking
"clean." Our oldest's markings will go on the left, middle in the middle,
and youngest on the right.
I didn't ask how much my father in law spent on the piece of wood, but I
know the wood burning kit was $15. All things considered, I *know* it was
less expensive (and more custom) than the one I originally loved!

Friday, February 10, 2012

Freezer Paper + Paint Drop Cloth = My New Love

I've been drooling over images of stenciled burlap and coffee sacks for over a year.  I've seen upholstered chairs, pillows, and even drapes full of relaxed charm.  Yes, much of it was designer / couture and very expensive.  Really?  $300 for a throw pillow?  Um. No.
Enter unbleached (6'x9') canvas paint drop cloth from Home Depot for $12 and a roll of freezer paper (thanks to my friend, Sue.) 

I spent some time deciding exactly how I wanted to redo those trite formal dining room chairs and played with designs on Sure Cuts A Lot 2 for my Cricut.  I finally settled on a script (Lasko Condensed) "E" and Engravers MT "Established 2002".  The freezer paper is so thin that even with a new blade and adjusted settings, it would occasionally tear with the blocky letters of Engravers MT font.  I was determined, so I just did a few extras.
Remove the seat cushion from the chair. (Mine were attached with 4 long screws.)
After cutting the freezer paper (shiny side down), I ironed it on to the "squares" of canvas (again, shiny side down) for the chairs.  I used a dry round paintbrush with black acrylic paint (50-97 cents at most craft stores) to fill in the stencil taking care not to saturate the paper or the fabric and to leave some inconsistencies in the paint.
Peel back the freezer paper, center the fabric on the chair cushion (already unscrewed them from the chair), and use a staple gun on the underside to keep the fabric taut on the chair cushion.  Start with one staple in the middle of the back or front edge of the cushion.  Then do one on the opposite edge.  Pull the fabric taut as you go, and add 2 more to the outside corners of those 2 edges.  Fill in the "empty space" of those edges with more staples as required.  Then, do the other two opposing edges in the same manner.  Depending on the cushion shape, the corners can be folded or just pulled until smooth.

I had so much leftover fabric after covering my 6 dining room chairs that I decided to make some placemats.  I used existing placemats as my template.  They are 18" wide rectangles.  I used the script "E" on 3 of them, but I didn't want them to all be too "matchy matchy."  (My husband came in as I was thinking through this outloud, and he said, "Even *I* know that we don't want 'too matchy matchy'."  Lovely, I've created a monster.) I wanted something a little less formal, but that could still be "fancy" enough for our (more casual) formal dining room.  I found an image of a place setting that was almost perfect.  I altered it some in Sure Cuts A Lot 2 and played with it some on the Cricut until I had forks, knives, and spoons that I loved.  Now, the remaining 3 placemats have a formal place setting with 3 forks, 3 spoons, and 2 knives stenciled on (using the freezer paper and black acrylic paint.) 
I *STILL* have fabric left from that original 6'x9' drop cloth.  I'm considering some napkins.  I didn't cut it in such a way that I could do a runner.  This project has given me inspiration for several other "someday" projects.  For now, I'm THRILLED with the 6 reupholstered chairs and 6 placemats that cost less than $15 to make!  (Actually, I think I will make some placemats for Sue since she did bring freezer paper to me to start this madness!)

Sunday, January 29, 2012

Closet Makeover & Organization - Part 3

This project has really taken on a life of its own.  I'm not sure how many "parts" need to happen before it's complete....
Before
Jewelry Organization

Here are a few "Before" pictures as a refresher....or visual odor actually.  Nothing refreshing about these.


Here is what I've been up to...

First, I added this "pressed tin" wallpaper behind my shoe shelving.

(Imperial VP131600 Architectural Tin Ceiling Paintable Wallpaper on Amazon for $14.99)


Then, after the wallpaper had dried, I added some Valspar metallic silver glaze (that I already had from another project) to the wallpaper


I despised the light in my closet.  It held one puny little bulb to illuminate my entire closet, and it didn't do anything for me.  We changed that.  I will say that I had an incredibly difficult time getting this light.  (First, a box of organic diapers was shipped to me instead.  Then, they had to refund my $, which took a week.  Then, it wasn't available.  When it finally was, and I did order it, it looked like it had fallen off of the back of a truck and had some missing/broken pieces.  It was a booger to put together, too.)  It's intended to hang a little lower as a chandelier, but my doll of a husband worked with feathers and crystals in his face to install this for me.  The result?  swoon.

It's intended to hang lower like this one....I'm in love with it anyway.


Monday, January 23, 2012

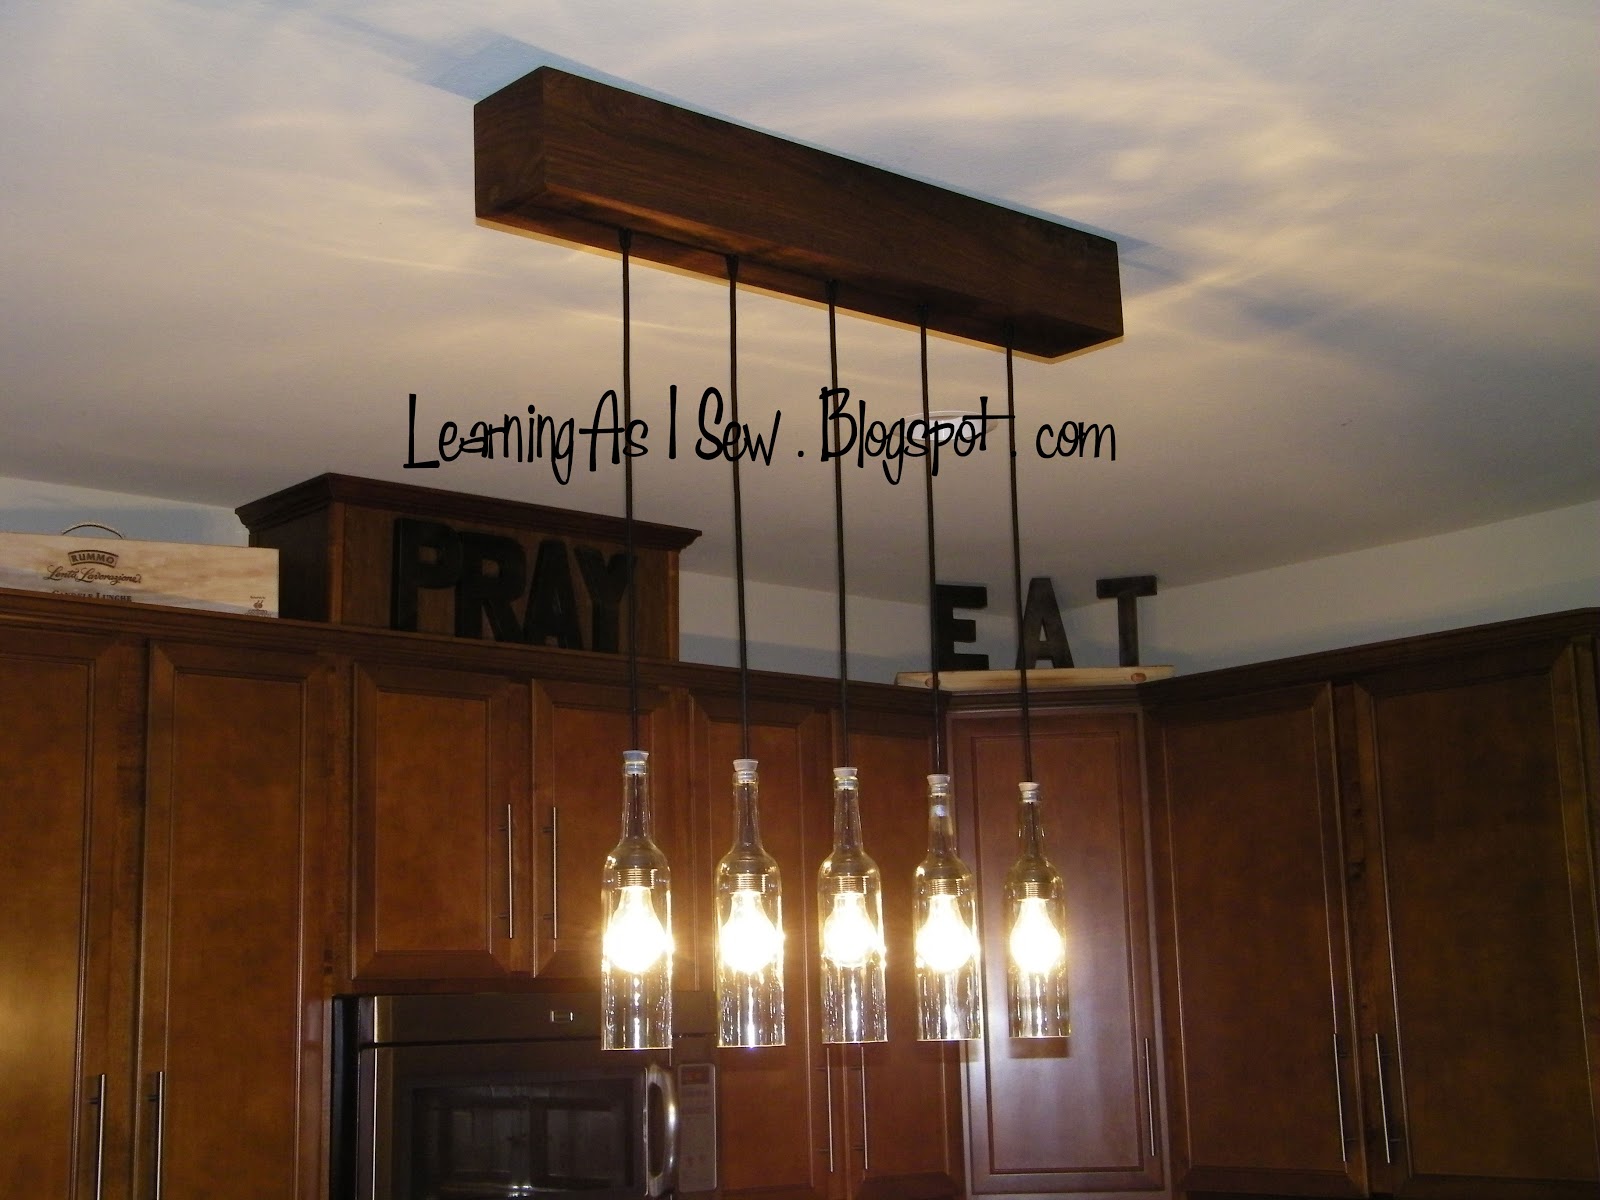
Kitchen Update: Wine bottle chandelier

You may have heard murmurings about my light fixture in our kitchen.  I wanted something that would give me more light and have less visual weight in the middle of the kitchen.  I've looked for over a year for *the* perfect light.
Here is what we had...


Recently, I stumbled across Glo828's Etsy shop.  I started talking to her about what I wanted, and she custom made our new light...that I ❤.  5 clear wine bottles and a custom-built "beam" at the ceiling.


Now, I'm anxious to have the one for over our breakfast table complete!  (She did yellow chardonnay bottles for us, but we are doing a wine barrel base.)

Friday, January 20, 2012

Closet Makeover & Organization - Part 2

I've run into some road blocks in this process, so my closet makeover is not yet complete.  (Thanks to a specific online retailer and the many frustrations that they've caused.  I STILL don't have everything that was in my original order.)
So, I decided I would share a few things that I have done!
This is on the side of my shoe storage.  I added knobs (from Hobby Lobby and Ikea) and pulls (from Target.)  I found the mirror at Hobby Lobby on clearance.
I took down the old pocket jewelry organizer that was hanging in this space that had become a mess. This is a short towel rod (about $6 at Target) and shower curtain hooks (about $11 for the set.)


 I had an old wooden shelf that I spray painted black and added beneath the towel rod of necklaces.  This is just inside the door of my closet and a perfect landing spot for jewelry (wedding ring and watch) as I change.
 Since I'm unable to show you the rest of the closet, here's a sneak peak of a few of the things to come.  I'm so excited that I can hardly stand it!


Tuesday, January 17, 2012

Closet Makeover & Organization - Part 1

Do you want to see something AWesomeFUL?   I have a dark secret that I think I'm ready to share.
This is was my closet as of the beginning of the year.  Over the past week, I've spent a few hours in there cleaning it out and reorganizing.  I have some amazing things to share with you, and I really don't know if I can wait until it's complete for the reveal.  I may have to share it in stages.  It's in progress (more items will be arrive today), but so far the new jewelry organization is my Fave.  *swoon*
Take a look at the atrociousness.

From the door looking in....


The back "wall"....(Yes, this is 6 different images that are somewhat pieced together to give you a better understanding.)

The far side wall and the wall with the door....(Again, multiple pictures)

Stay tuned for the AFTER!

Sunday, January 15, 2012

Boy's Room Makeover 2

I shared that I've been working on our son's room.  I'm still working....but I just had to share the progress.

Out with the standard "tan" walls that the builder painted every wall in our home!  Gray and black add sophistication and a hint at his love of all things "Spy."  I painted the top 2/3 of the walls and the ceiling gray.  I painted the bottom 1/3 black, and then I added the New York skyline all the way around the room.  I added chalkboard vinyl in the spy office, by the Brooklyn Bridge, and under the Statue of Liberty for him to leave secret messages for his spy friends.  I bought glow in the dark paint that I was so excited to use.  Fail. It doesn't glow much when it's painted on.  (It glows great in large amounts...ie. in the tube.)  I intended to make it so that many of the buildings' windows were lit up when the lights were out like a true city.  I'm still trying to find something that will work.  The curtains have been replaced with some that I picked up on sale at Ikea, and they're perfect.  (Black Sarita and gray Ritva)

Because neither my son or I could fully separate with all of the pieces that I had so lovingly made for his nursery, the bear I made from his baby bedding rests on his bed here.
This angle is deceiving; the Empire State building is taller than the Chrysler building which is also taller than the building to the left of the Chrysler building.
The framed pictures on the wall came from a trip my husband and I took to NYC in 2010.  We were there for the 9/11 anniversary and were able to see the pillars of light.  The picture on the shelf is of the women in our family at Top of the Rock; we went for the 10th anniversary of 9/11 in 2011.
I hope to have my father in law build a custom shelving unit with a reading bench for the space where the crane and lamb chair are in the picture below.
The table lamp next to the bed is also from Ikea and has an adjustable height.

 I created a "Secret Spy Office" with a piece of fabric, some snaps, paint, bricks, and some pockets.  The pockets are on the inside and can be used for storing an mp3 player for use in bed and "mail" in the office.