You can buy ALL of my Elf on the Shelf printables for easy download in the store on the right side of the page.
I love to cook, bake, sew, scrapbook, and CREATE! I've never had a sewing class or formal cooking training. I learn as I go, and I enjoy the process.
Saturday, November 28, 2020
Elf on the Shelf: Magic Size It FREE Printable
You can buy ALL of my Elf on the Shelf printables for easy download in the store on the right side of the page.
Elf on the Shelf: Staying Alive Disco Party in Quarantine Printable
Let's face it, we're all getting through this the best we can. Our elves, Buddy Kringle and Football, decided to make light of it all and have a 70's Disco Party to celebrate "Stayin' Alive!" If you have some of the little Disco ball ornaments, use them! Feel free to line the dance floor with walls of toilet paper, hand sanitizer, and disinfecting wipes.
Here is the printable backdrop.
You can buy ALL of my Elf on the Shelf printables for easy download in the store on the right side of the page.
Thursday, November 19, 2020
Kid Food Critic Journals
A mom recently asked about what others do when kids don't want to eat specific foods. Years ago, I created these Food Critic Journals to help my kids track, express likes and dislikes, and have more control over foods they eat. I'm not a nutritionist or a child psychologist - just a mom who wanted to find a way that helped my kids try new foods and have some say in meal times. I know there's a new "Choose My Plate" diagram that shows that vegetables should be the "staple" of a plate, but this old school food pyramid still helped my kids understand the food groups.
There are a significant number of tips and tricks on the ChooseMyPlate.gov site, too.
Ask your kids what they want for dinner! Have them help in the kitchen. Even little ones can help wash vegetables, measure ingredients, stir, etc. When they are part of the planning and preparation, they are much more willing to try the foods.
In our home, we had our kids try 3 bites (some people call them "Polite Bites" or "No thank you bites") of a food to be able to critique it in the journal. It helped me better understand and literally see which foods (or groups or types of foods) each kid liked and disliked. One had a very clear issue with some food textures, and we didn't make him eat any of the foods that had similar textures since it would make him sick. He could try those on his own as he got older.
I've found that putting together meals that had at least one item on the plate that everyone liked made meal times easier. Only introducing one new food at a time during regular family dinners was also more willingly accepted.
Keep things positive! We don't allow anyone to talk negatively about foods during meals. You can talk about color, texture, flavors, etc. Have older kids try to guess what ingredients or spices were used in dishes. If someone dislikes something, we say, "I don't care for ____," or "_____ isn't my favorite," or "I really prefer ____ over ____." We get the picture, but we don't diminish the food choices that others may really enjoy. If the older brother makes gagging noises at the table while eating XYZ, the younger brother is now suddenly less interested in eating his favorite XYZ. So keep it positive.
A Little Food Critic's Journal download
 |
| Little Food Critic Journal Pages |
 |
| Little Food Critic Journal Summary Page |
Similarly, my oldest only wanted to eat at the same "restaurant" every time. This became a fun game for us! He was willing to try all sorts of new places, and he always made me laugh as we waited for our food. He would take the time to examine and assess the cleanliness, amenities, decor, etc.
A Little Restaurant Critic's Journal download
I hope these help you and your family!
Wednesday, November 18, 2020
Elf on the Shelf: The Floor Is Lava! Free Printable
Tape the volcano to a wall. You have red tissue paper on hand already for your Christmas wrapping, so crumple up a couple of pieces and place them next to the volcano. Your elf can be in the Christmas tree, on top of furniture over the tissue paper, taped to the wall, or strung from the ceiling to avoid the lava.
You can buy ALL of my Elf on the Shelf printables for easy download in the store on the right side of the page.
Sunday, November 15, 2020
Sweet Potato Gnocchi with Sage Browned Butter Sauce
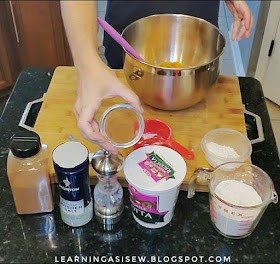
Ingredients:
For the Gnocchi:
- ~2 lbs. sweet potatoes
- 1 1/2 t ground cinnamon
- 2/3 C whole milk ricotta cheese, well drained
- 1 t salt
- 1/2 t black pepper
- 1 1/2 C all-purpose flour, plus 1/3 C for the work surface
- 1/2 C unsalted butter (1 stick)
- 20 fresh sage leaves
- 1 t ground cinnamon
- 2 T maple syrup
- 1 t salt
- 1/2 t ground black pepper
Directions:
For the Gnocchi:
- Preheat the oven to 425 degrees F.
- Pierce the sweet potato to allow steam to escape. (You'll notice the repeated notes about moisture for making gnocchi.)
- Bake the sweet potatoes until tender & fully cooked, between 40 to 55 minutes depending on size.
- Cool slightly. Cut in half & scoop the flesh into a large bowl.
- Mash (or puree) the sweet potatoes & transfer to a large measuring cup to make sure the sweet potatoes measure about 2 cups. If they are "wet", drain off any liquids. Extra moisture can make the gnocchi require too much flour.
- Transfer the mashed sweet potatoes back to the large bowl.
- Add the ricotta cheese (drain any liquid, don't stir it back in) , salt, cinnamon, & pepper & blend until well mixed.
- Taste mixture to determine seasonings.
- Add the flour, 1/2 cup at a time until a soft dough forms. Additional flour may be required if the dough is still really sticky.
- Lightly flour a work surface & place the dough in a ball on the work surface.
- Divide dough into 6 equal balls.
- (***Test a couple of gnocchi before you roll ALL of the dough out. Shape & cook a few dumplings in a small pan of simmering salted water to make sure they're right before rolling & cutting the whole batch. If the gnocchi fall apart, work the dough a bit longer & add a little more flour.)
- Roll out each ball into a 1-inch wide rope.
- Cut each rope into 1-inch pieces.
- Roll the gnocchi over the tines of a fork.
- Transfer the formed gnocchi to a large parchment-lined baking sheet.
- Continue with the remaining gnocchi.
- Can be frozen in single layers at this point and then transferred to a Ziploc for storing until ready. (Do not defrost before cooking.)
- Meanwhile, bring a large pot of well-salted water to a boil over high heat. Once the water is at a rolling boil, add the gnocchi in 3 batches & cook until tender but still firm to the bite, stirring occasionally, when they float to top, remove them. If you overcook them, they get really gummy.
- Drain the gnocchi using a slotted spoon onto another lined baking sheet. Tent with foil to keep warm & continue with the remaining gnocchi.
For the Brown Butter sauce:
- While the gnocchi are cooking, melt the butter in a large sauté pan over medium heat.
- When butter has melted, add sage leaves. Continue to cook, swirling butter occasionally, until the foam subsides & the milk solids begin to brown.
- Remove the pan from the heat. Stir in cinnamon, maple syrup, salt, & pepper. Careful, mixture will bubble up.
- Gently stir. When bubbles subside, toss cooked gnocchi in brown butter.
- Transfer gnocchi to a serving dish & serve immediately.
Friday, November 13, 2020
Peanuts Themed Christmas Hallway
 |
| Charlie Brown and Linus in the Tree Farm |
 |
| Lucy offering advice to Charlie Brown |
 |
| Ice skating on the pond |
Wednesday, November 11, 2020
RV Renovation: Decor, Coffee Bar, Organization, and more
 |
| Adventure Awaits SVG file can be found here. |

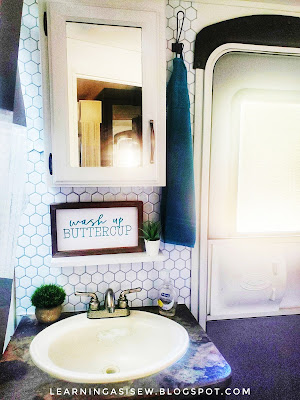
I made this little shelf with a piece of leftover wood from one of the other projects. I painted it white, added 2 L brackets, screwed the "Wash up, Buttercup" sign and the little fake plant to the board from the under side, and attached it to the wall over those oh-so-cute (but still what nightmares are made of) hexagon Tic Tac Tiles.


