Check out our other Elf on the Shelf Ideas and Free Printables here! Please feel free to pin, link, and share, but link to our blog posts and not directly to the printables.
Thursday, December 19, 2013
Elf on the Shelf: Tight Rope, Zip Line, or Swing
With a strand of curling ribbon, you can create a high wire / tight rope, zip line, or swing. Add a straw (either on the ground or hanging from his hand) for the elf to hold if he was walking the tight rope. Use a full size candy cane for him to zip line. Add an empty toilet paper roll (cover it in wrapping paper) and extra slack to the ribbon for an elf swing.
Check out our other Elf on the Shelf Ideas and Free Printables here! Please feel free to pin, link, and share, but link to our blog posts and not directly to the printables.
Check out our other Elf on the Shelf Ideas and Free Printables here! Please feel free to pin, link, and share, but link to our blog posts and not directly to the printables.
Sunday, December 15, 2013
Elf on the Shelf: Quick Miniature Golf Game
What you need:

- Green construction paper, foam sheet, or felt.
- Scissors (and a hole punch if you're using paper)
- Miniature candy cane (a.k.a. golf club) - Our oldest thought this was funny since it's "miniature golf," our little ones didn't get it.
- Miniature marshmallow or a white sugar pearl (for the golf ball)
- Straw, chopstick or lollipop stick (and a way to "anchor" it: ie. clay, play-doh, etc. - I used a paper straw and cut the bottom into 4 long slits that fanned out beneath the putting green to hold it upright.)
- Red fabric, foam, felt, or construction paper for the flag
Easy and fun!
Check out our other Elf on the Shelf Ideas and Free Printables here! Please feel free to pin, link, and share, but link to our blog posts and not directly to the printables.
Saturday, December 14, 2013
Elf on the Shelf:Baking Gingerbread Cookies Printable
I hope you're enjoying our Elf on the Shelf ideas this year; I also hope that you feel free to make each of them your own! I'd love for you to share what YOU'RE doing with the ideas I've shared to make them work for your family.
Did you make the Chef's hat and Apron? Maybe you made the Barista Apron? Maybe you intend to bake cookies with your kids today or decorate a gingerbread house? Have your elf bring some Gingerbread Men to your kitchen (or to a kid-sized play kitchen.) I made a foil cookie sheet to place my Gingerbread people on (directions on printable.) This is the FREE Printable Gingerbread Man template I used to cut them from thin tan foam, but they could easily just be cut from paper. You could also print them on paper and place a rectangle of them in a pan as if they're on parchment paper. I decorated the gingerbread people with puff paint, but you can leave them plain if you wish.
It would be cute to use the template to make a long chain of "paper dolls" by folding brown construction paper accordion style and having the hands/feet go just past the edge.
Friday, December 13, 2013
Elf on the Shelf Ideas and DIY
MORE ELF ON THE SHELF IDEAS!
If you made the DIY Cinnamon Rolls, maybe your elf needs a chef's hat and apron to play in the kitchen, too? The chef's hat is made with a white coffee filter, a 3/4" strip of white cardstock and tape. I used a strip of packing tape and trimmed in in half lengthwise. Wrap it around your elf's head with the sticky side facing out. Adhere the tape to itself to create a measured template. Flatten the coffee filter out, and begin attaching and folding the edge of the filter to the sticky side of the tape "ring" to create a pleated look. Once finished, use the cardstock strip to cover the raw edges of the filter. Tape one end to the back side of the "hat." Trim the excess end (if any) and tape at the back side.
The apron is a paper towel (but could easily be made with thin foam sheets - and then a ribbon tie would be easier; I just didn't have any) cut into a smaller rectangle (about 4 1/2" by 5" - long side being verticle) and folded with tape to hold the backside together. (I didn't give it "strings" since his scarf covers it on our elf.)
You can find directions for making your own sleeping bag (2 methods) HERE. You can create a slumber party, add a book, hot cocoa, or whatever your heart desires. Ours just snuggled up by the fireplace for a quick and easy elf night.
Our elf was caught break dancing with disco ball ornaments (found 6 per pack at our hobby store) and mirrored trees (that I had on hand.) He moved them all to our Christmas village so he could spin in snow!
I found Elf on the Shelf ornaments (elf sitting on white jingle bell) at our local hobby store (they were on sale for 50% off, so were about $3 each.) The elf brought them and had them hanging from each hand and a foot! He left a note on the chalkboard, and hung a "Ho Ho Ho" banner he found for a dollar at the One Spot at Target.
Check out our other Elf on the Shelf Ideas and Free Printables here! Please feel free to pin, link, and share, but link to our blog posts and not directly to the printables.
Tuesday, December 10, 2013
Elf on the Shelf: In the Nativity with Bible, & DIY Mini Cake for Jesus
Last year, our elf was also spotted in our nativity scene holding baby Jesus. With our twins being only 4 years old, our elf tried to be more relatable. He brought his own elf-sized Bible opened to The Christmas story in the book of Luke and a miniature birthday cake!
You can find the free Bible printable here. Be sure NOT to select "Fit to Page" when printing.
The birthday cake can be easily made with 2 Oreo type cookies and icing between and around them. Cut a regular birthday candle down to size. The cakes work best if made a couple of days before to soften the cookies so the candle inserts easily without breaking the cookie. These can also be made if your child celebrates a birthday during the time your elf visits. (Happy birthday to my nephew, Nick!)
*We didn't have any pre-made icing on hand (and I was in a hurry), so my icing is a little thin, because I just mixed milk and powdered sugar. You can make your cake as fancy as you wish, but mine certainly looks like it was our crazy elf's attempt at a cake!
Check out our other Elf on the Shelf Ideas and Free Printables here! Please feel free to pin, link, and share, but link to our blog posts and not directly to the printables.
Saturday, December 7, 2013
Elf on the Shelf: Don't Do It - Let's Be Honest: Crepe Paper Door
So, let's be honest...some of the "so cute" ideas you've seen on Pinterest take a ridiculous amount of time! For example, "Oh, let's crepe paper the door for when the kids wake up!" Yeah, great idea if you have ONE kid that is a heavy sleeper or you aren't doing them by yourself, otherwise RUN AWAY NOW! First of all, it takes MUCH longer than you would expect to quietly crepe paper the door to the extent you see below, and secondly, if you have multiple kids...it takes FOREVER!!!! RUN! It seems like a great idea, but that's NOT reality. It takes less than 1 roll of crepe paper to do 3 doors and "swag" the living room. So, yes, it's cheap. That doesn't mean I'd do it again.

UPDATE: If your kids are little, you might want to leave enough room for them to crawl out beneath the lowest streamer. Our 4 year old twins weren't sure what to do when they woke up.
Check out our other Elf on the Shelf Ideas and Free Printables here! Please feel free to pin, link, and share, but link to our blog posts and not directly to the printables.
Elf on the Shelf: Egg Message
We wrote on our eggs with Wilton Food Writers in an effort to be as food safe as possible. You could leave ANY message. "Please Be Nice." "Don't be Naughty!" "Love Your Sister." "Have A Great Day!" You get the idea.
I will say, if you are going to write the word "Christmas," pay attention to where you start and end the word. Keep "Christ" as one row of eggs. I know, I'm OCD, but I think it's important that if your elf is an opportunity in your household to talk about your faith that you don't have your elf make choices that divide His name.
(*I am not responsible for the food safety of writing on any eggs with any instruments.*)
Check out our other Elf on the Shelf Ideas and Free Printables here! Please feel free to pin, link, and share, but link to our blog posts and not directly to the printables.
Elf on the Shelf: Elf Brings Craft/Art Project
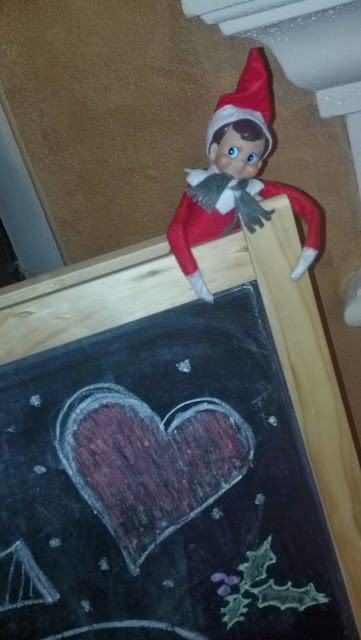
It is COLD outside right now, so our Elf thoughtfully brought an indoor elf-themed art project. (Purchased for $1 each on sale at our local hobby/craft store.) He drew on the kids' chalkboard to make sure they knew about it.
Check out our other Elf on the Shelf Ideas and Free Printables here! Please feel free to pin, link, and share, but link to our blog posts and not directly to the printables.
Elf on the Shelf: Welcome Breakfast / Goodbye Breakfast
Whether you do a "Welcome Breakfast" when your Elf arrives, a surprise breakfast during his time with you, a "Goodbye Breakfast" the morning he leaves, or you just want a fun Christmas themed breakfast, this post has something for you!
The spread...
TABLE
Honestly, I had ordered a super cute red and white chevron fabric for a runner or placemats for the table, but it didn't arrive in time, so I used a gold tablecloth that I had on hand along with some red and white poly napkins. You could use festive paper napkins as well.
CHAIRS
The chairs are adorned with Santa hat chair covers from the dollar store. They had to be worked to get over the tops of my wide chairs, but it was fine.
HOT AIR BALLOONS for the Elves
The hot air balloons for the elves (my sister and her family were staying wit us Thanksgiving night, so we had both elves arrive at my house the morning after Thanksgiving) were made with Chinese paper lanterns, solo cups, my free PRINTABLES, curling ribbon, peppermint ornaments, and mini-tree Christmas "lights."
ORNAMENT CHANDELIER
The ornament chandelier is made with 75 shatterproof ornaments and red satin cord. I don't actually recommend making one. It was a pain in my - yeah. A royal pain.
CENTERPIECE
The centerpiece is a collection of "trees." I had all of the silver and white ones, and they are displayed on my entryway table through the holidays, but I picked up a few red ones to go with the theme, and I used them on the table for the morning. (I later moved them to my entryway table when breakfast was over.)
PLATES
I have a huge stack of glass plates. I bought them 10+ years ago when we were having a huge reception at our home. I figured they would match anything, and when we had a large number of guests, they would be perfect. I use them ALL the time. They worked great for this, because I used red chargers, my free PRINTABLES, and the glass plates. It dressed up the printables even a little more than the clear plastic plates would have. (Even though, those would certainly work as well.)
ORNAMENT CRAFT
I placed the Gratitude Ornament PRINTABLE under the chargers, and I used DIY cupcake stands to hold red and white cupcake liners with the clear acrylic ornaments. This will absolutely become an annual tradition! Ages 4-14 willingly participated in this craft, and it was great to take some time to remember what is really important. I only wish I had purchased enough for the adults to each make one as well.
HOT CHOCOLATE with SANTA MARSHMALLOWS
White coffee mugs each held a large marshmallow with a Santa hat drawn on with Wilton Food Writers in anticipation of hot chocolate. Red and white paper straws were at the ready, as well.
FAVORS
I picked up a box of shatterproof "candy" ornaments, and I wrote each child's name on the side of it to add to their annual ornaments as a remembrance of the breakfast fun.
REINDEER PANCAKES
Lastly, we made a reindeer pancake breakfast with bacon, chocolate chips, and strawberries!
Do you do a Welcome Breakfast? What are your traditions?
Check out our other Elf on the Shelf Ideas and Free Printables here! Please feel free to pin, link, and share, but link to our blog posts and not directly to the printables.
Friday, December 6, 2013
Elf on the Shelf: DIY Scarf, Ear Muffs, and Scone
Yes, I realize that those items seem random, but they were all used in the same image, and I decided I could share them all at once. (I've already shared the Free Printable Newspaper and Kringle's Koffee cups.)
For the Ear Muffs:
I chose 2 colors of fleece - one for the "inside" and one for the "outside" of each muff. Although felt may seem like it will work, it really isn't fluffy enough, so you'll need more layers. Glue 2 circles together with the end of the pipe cleaner between them, and repeat at the other end.
DIY Elf Scarf (Short or Long):
Check out our other Elf on the Shelf Ideas and Free Printables here! Please feel free to pin, link, and share, but link to our blog posts and not directly to the printables.
For the Ear Muffs:
- Pipe Cleaner - 4 1/4"
- Fleece scraps cut into 4 (or 6 depending on how thick you want the muffs) 1/2" circles - you can use the scraps from the corners you cut from the sleeping bag pieces if you made a sleeping bag for your elf
- Scissors
- Glue (I used a glue gun)
I chose 2 colors of fleece - one for the "inside" and one for the "outside" of each muff. Although felt may seem like it will work, it really isn't fluffy enough, so you'll need more layers. Glue 2 circles together with the end of the pipe cleaner between them, and repeat at the other end.
DIY Elf Scarf (Short or Long):
- 5-8" of fleece or felt (1/3-3/4" wide)
Cut felt or fleece to desired length and make slits at both ends 1/2-1" deep (depending on if you made a short or long scarf)
DIY Scone for your Elf:
- 4" strips of thin tan, cream, or chocolate colored foam sheets in 3/4" width
- Fold one corner over to the opposite long edge. Continue folding (as you would a flag.)
- Glue to keep it's shape.
- Color with marker if you want to add "cranberries," "orange," "blueberries," or "chocolate chips."
- Use white or dark brown puff paint for the "icing." Sprinkle the wet puff paint with iridescent glitter flakes if desired.
Check out our other Elf on the Shelf Ideas and Free Printables here! Please feel free to pin, link, and share, but link to our blog posts and not directly to the printables.
Elf on the Shelf: Gone Fishing Free Printable
Whether your elf is fishing for Goldfish crackers or hanging out by your fish tank, here's an easy free printable "Gone Fishing" sign to add to the scene. I attached mine to a red and white striped paper straw and placed it in his hand.
Check out our other Elf on the Shelf Ideas and Free Printables here! Please feel free to pin, link, and share, but link to our blog posts and not directly to the printables.
Check out our other Elf on the Shelf Ideas and Free Printables here! Please feel free to pin, link, and share, but link to our blog posts and not directly to the printables.
Thursday, December 5, 2013
DIY Homemade Sugar Scrub Gifts and Free Printable Tags
We live in a fairly humid climate, so once the cold weather arrives and the heaters turn on, I dry out. SERIOUSLY dry out. My hands look like molted snake skin, and my fingers crack. I.hate.it. I've tried a ton of things, but everything that has worked is so expensive. I've come up with a concoction that is not only easy to make, but it's inexpensive in comparison to it's counterparts. Best of all it WORKS! I'm giving containers of it away this year for Christmas, and I thought I'd make it easier for you to gift it as well!


Recipe for Homemade Warm Sugar Scrub
- 1/2 Cup Coconut Oil (This *can* be substituted with another oil, but I prefer coconut to make the mixture thicker. It's not incredibly expensive either.)
- 1/4 Cup Olive Oil (unscented/unflavored - meaning not rosemary, garlic, etc.)
- 1/4 Cup Canola or Vegetable Oil
- 1 Tbsp. Vanilla Extract (I prefer clear Mexican Vanilla)
- 1/2 tsp. Almond Extract (Can be substituted with any scent you choose: citrus, mint, lavender, etc.)
- 1 Tbsp. Honey
- 16 oz. Dark Brown Sugar
- 1/4 Cup Raw Sugar (Can be substituted with regular sugar.)
- 2 Tbsp. Vitamin E
- More Canola Oil as needed (It doesn't need to be "soupy," and I haven't had to add extra, but it will depend on how dry your sugars are.)
I bought 5 oz. glass jars in sets of 4 (Rajtan) at IKEA for $3.99, and I made stickers to go on the side. Each recipe makes enough for ~4-5 of the jars depending on how full you fill each jar.
In order to protect the stickers, you can either use weatherproof sticker sheets, or you could place a piece of clear packing tape over them before cutting them out of a regular sticker sheet. I intended for the stickers to be cut with a 2" round punch, but you could easily cut them in squares, etc. OR - if you don't want to use them as stickers, you could print them on cardstock and tie them to your containers.
I've created the printable in a few colors, because I know that some of you may want to coordinate with your other gift wrapping if you're anything like me. I personally am using yellow and white stickers with a jute/twine ribbon and wrapping gifts in brown kraft paper. (Why am I using yellow and white? Well, because we had the most amazing Creamy Limoncello at an Italian restaurant in the Bronx this year, and I'm also going to be making small bottles of that to share with my loved ones! More to come.)
 |
| Rajtan jars of Sugar Scrub on the bottom left. Empty bottles (from World Market) for Creamy Limoncello are in wait (Top Left.) Homemade Garlic Olive Oil (Center) and my Hubs' Homemade Salsa on the right. |
 |


Wednesday, December 4, 2013
Elf on the Shelf: Candy Cane Lanes - Let's Bowl!
"Let's Bowl, Let's Bowl, Let's Rock'n'Roll!"
Have you seen the miniature bowling sets at the party store or dollar store? They're really inexpensive (you can also get them from Oriental Trading Co.) You could also use Tootsie rolls (shape them like bowling pins) and a jawbreaker, large marshmallow, marble, or even cotton ball to create the bowling set. Here is my way of making them more fun for our Elf on the Shelf!
Candy Cane Lanes Free Printable!
Check out all of my other Elf on the Shelf ideas and printables, too!

Have you seen the miniature bowling sets at the party store or dollar store? They're really inexpensive (you can also get them from Oriental Trading Co.) You could also use Tootsie rolls (shape them like bowling pins) and a jawbreaker, large marshmallow, marble, or even cotton ball to create the bowling set. Here is my way of making them more fun for our Elf on the Shelf!
Candy Cane Lanes Free Printable!
 |
| Thank you, Kitty, for this image of your elves using Candy Cane Lanes! |
As always, I encourage you to create some of the "super special" Elf surprises, and then trade them with your friends and neighbors so that the joy (and efforts) are shared!!!
By all means, share this, pin it, print it, blog about it, but please link back to this post.
You can purchase all of my Elf on the Shelf printables in the store to the right for easy and immediate download.
Tuesday, December 3, 2013
Elf on the Shelf: DIY Sleeping Bag
I have 2 ways for you to make a sleeping bag for your elf. The "no-sew" option doesn't require a sewing machine or any sewing skills, but it actually takes longer. The sew option is unbelievably quick and easy.
I will say that I had some trial and error with the no-sew option, so please do as I SAY and not as I did. Your knots will actually be much prettier than mine making for a much nicer looking sleeping bag.
NO-SEW Sleeping Bag (based on the small Elf on the Shelf as pictured)
2 pieces of fleece cut to 11" x 20"
1 piece of fleece cut to 11" x 15"
1 template 3" x 3" with marks every 1"
Layer the pieces of fleece as shown: large patterned, large solid, small patterned - all aligned at the bottom. Place the elf on the fleece with his feet 3 inches from the bottom aligned edge. Fold over the small piece to allow for the elf's face to be fully visible.
Cut 3 inch squares from each corner. Cut 3 inch deep cuts spaced every 1 inch all the way around.
Tie the top piece in a knot with the 2 bottom pieces as you work your way around the sleeping bag. Do not pull them too tight, or it will make your sleeping bag bunch up.
Ta-Da!
The "sew" method.
3 pieces of fleece:
2 - 5" x 15" (one patterned, one plain)
1 - 5" x 17" (patterned)
Place the two longest pieces right sides together. With 1/2" seam allowance, sew the top and 2 1/2" down the sides. Trim the corners. Turn right side out. If you want the little "folded" look for the top "sheet", then take the short piece with right side facing up, and fold down the top 1/2" - 1" and pin it in place. Place the shorter piece with the right side facing the right side of the other patterned piece (if you folded, then the folded side will be hidden "inside" and nearest the sewn end of the other two pieces.) Sew the remaining edges together, trim corners, and turn right side out.
Check out our other Elf on the Shelf Ideas and Free Printables here! Please feel free to pin, link, and share, but link to our blog posts and not directly to the printables.
Subscribe to:
Posts (Atom)


